How to Read OBD1 Codes Honda: Complete Diagnostic Guide
How to read OBD1 codes Honda vehicles can usually be done without a scanner by using the built-in diagnostic system and counting the Check Engine Light flashes. Older Honda vehicles with OBD1 systems allow you to retrieve stored trouble codes by activating the diagnostic mode and reading the flashing light pattern from the ECU or dashboard warning light.
The complete details are explained below. In this article, you will learn how Honda OBD1 systems work, which vehicles use OBD1, how to locate the diagnostic connector, how to retrieve flash codes, how to interpret the numbers, and what to do after finding a trouble code.
How to Read OBD1 Codes Honda Vehicles
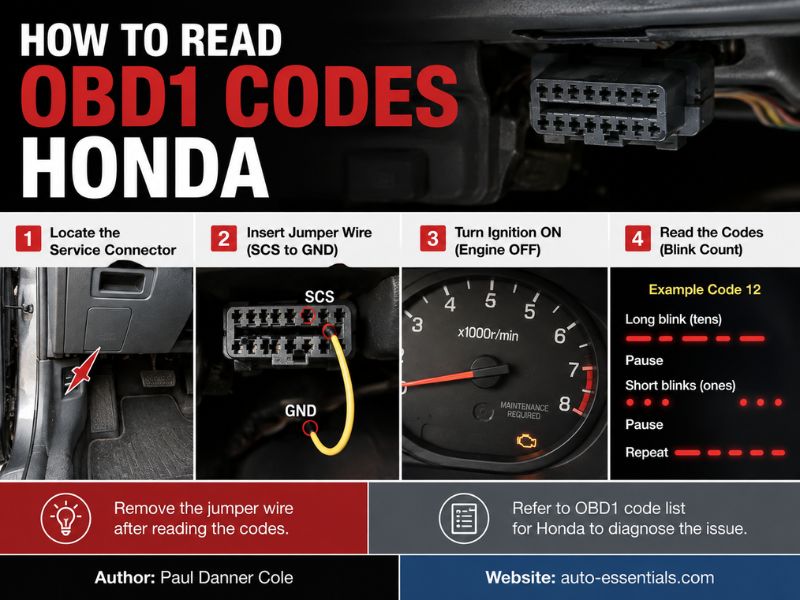
Honda OBD1 systems use a simple flash-code method to display diagnostic trouble codes.
Unlike newer OBD2 vehicles that require a scanner connected to a standardized 16-pin port, many older Honda models allow owners to retrieve codes manually.
The general process involves:
- Locate the Honda diagnostic connector.
- Activate the diagnostic mode.
- Turn the ignition switch ON.
- Observe the Check Engine Light or ECU LED flashes.
- Count the flash pattern.
- Match the code with a Honda trouble-code chart.
Honda OBD1 systems were mainly used on vehicles produced before the widespread adoption of OBD2 in 1996.
The exact procedure can vary depending on the model, engine, and year, so always confirm the correct method for your specific Honda.
What Is Honda OBD1?
Honda OBD1 is an early onboard diagnostic system used before standardized OBD2 systems became common.
The system monitors different engine and emissions components and stores a trouble code when it detects abnormal operation.
Honda OBD1 can detect issues involving:
- Oxygen sensors
- Fuel injection systems
- Engine temperature sensors
- Throttle position sensors
- Intake air sensors
- Ignition systems
- Electronic control components
When the ECU detects a problem, it stores a code and activates the Check Engine Light, also called the Malfunction Indicator Lamp (MIL).
The main difference between OBD1 and OBD2 is that OBD1 systems are manufacturer-specific and usually require manual code retrieval methods.
Which Honda Vehicles Use OBD1?
Honda mainly used OBD1 systems during the late 1980s and early to mid-1990s.
Common Honda OBD1 vehicles include:
- Honda Civic (older generations)
- Honda Accord (older generations)
- Honda Prelude
- Honda Integra
- Acura models from the same period
However, the exact diagnostic system depends on the production year and market.
Many 1996 and newer Honda vehicles use OBD2, which requires a scanner connected to the standard diagnostic port.
Before attempting an OBD1 procedure, confirm that your Honda has an OBD1 ECU.
Where Is the Honda OBD1 Diagnostic Connector Located?
Honda OBD1 vehicles usually have a small diagnostic connector located inside the passenger compartment.
Common locations include:
- Under the passenger-side dashboard
- Near the ECU
- Behind the center console area
- Near the kick panel
Honda commonly used a small 2-pin service connector for retrieving codes.
The connector is often covered with a protective cap and may be tucked away near the ECU wiring harness.
Do not confuse it with other electrical connectors. Only use the diagnostic connector designed for code retrieval.
How to Read OBD1 Codes Honda Step by Step
Follow these steps to retrieve Honda OBD1 trouble codes.
Step 1: Locate the Service Connector
Find the Honda OBD1 diagnostic connector under the dashboard.
It is usually a small connector with two terminals.
Step 2: Connect the Diagnostic Connector
Use a jumper wire or suitable connector to bridge the two terminals.
This places the ECU into diagnostic mode.
Be careful not to connect unrelated wires or connectors.
Step 3: Turn the Ignition ON
Turn the key to the ON position.
Do not start the engine.
The Check Engine Light should begin flashing.
Step 4: Count the Flashes
Honda OBD1 codes are displayed using long and short flashes.
The number of flashes represents the trouble code.
Record the sequence carefully before turning off the ignition.
How Honda OBD1 Flash Codes Work
Honda uses a simple flashing system to display stored trouble codes.
The Check Engine Light will flash a pattern that represents the code number.
For example:
- Long flash = first digit
- Short flash = second digit
A code 12 would appear as:
- One long flash
- Two short flashes
A code 21 would appear as:
- Two long flashes
- One short flash
If multiple codes are stored, the ECU will display them one after another with a pause between each code.
Write down every code before diagnosing the problem.
Common Honda OBD1 Codes
Honda OBD1 codes vary depending on the ECU and model, but common examples include:
Code 1
Oxygen sensor problem.
Code 6
Engine coolant temperature sensor issue.
Code 7
Throttle position sensor problem.
Code 8
Top dead center (TDC) sensor issue.
Code 9
Cylinder position sensor problem.
Code 10
Intake air temperature sensor issue.
Code 12
Exhaust gas recirculation (EGR) system problem.
Code 14
Electronic air control valve issue.
Code 16
Fuel injector problem.
Always verify the exact code meaning using the repair information for your specific Honda model.
How to Reset Honda OBD1 Codes
After repairing the problem, you may want to clear the stored trouble codes.
The common Honda OBD1 reset method is disconnecting battery power or removing the ECU backup fuse.
General steps:
- Turn the ignition OFF.
- Disconnect the negative battery terminal.
- Wait several minutes.
- Reconnect the battery.
- Start the vehicle and check whether the Check Engine Light returns.
However, resetting the ECU can also erase learned values.
It may reset:
- Idle adjustments
- Fuel-trim learning
- Radio settings
- Clock settings
After resetting, the vehicle may need time to relearn normal operating conditions.
Honda OBD1 vs OBD2 Differences
Honda OBD1 and OBD2 systems are different diagnostic platforms.
Honda OBD1
- Used mainly before 1996
- Manufacturer-specific system
- Flash-code diagnosis
- Manual code retrieval possible
- Limited live data
Honda OBD2
- Used mainly from 1996 onward
- Standardized 16-pin connector
- Requires an OBD2 scanner
- Provides more detailed information
- Supports emissions monitoring standards
An OBD2 scanner usually cannot communicate properly with Honda OBD1 systems because the protocols are different.
Can You Read Honda OBD1 Codes Without a Scanner?
Yes, Honda OBD1 systems were designed so technicians could retrieve codes without a dedicated scan tool.
You generally need:
- Access to the service connector
- A jumper wire
- Ability to count flashes
- A Honda code reference
However, reading the code is only the first step.
A trouble code identifies the system where the ECU detected a problem. It does not always mean the related component has failed.
For example, an oxygen sensor code does not always mean the oxygen sensor itself is defective. Possible causes include:
- Wiring problems
- Vacuum leaks
- Exhaust leaks
- Fuel mixture issues
- ECU problems
Proper diagnosis still requires testing.
Common Mistakes When Reading Honda OBD1 Codes
Many people make mistakes during manual Honda code retrieval.
Jumping the Wrong Connector
Honda vehicles have many electrical connectors. Only use the designated service connector.
Miscounting Flashes
The ECU flash pattern can be easy to misunderstand. Record the flashes carefully.
Replacing Parts Immediately
Do not replace a sensor only because a code mentions that sensor.
Always test the circuit and related components first.
Assuming All Hondas Use the Same Method
Different Honda models and ECUs may use different procedures.
A Civic procedure may not apply to an Accord or Prelude.
What If the Check Engine Light Does Not Flash?
If the Check Engine Light does not show codes, check:
- Correct diagnostic connector
- Ignition switch position
- ECU power supply
- Battery voltage
- Warning light operation
A damaged ECU, incorrect jumper connection, or electrical issue may prevent code retrieval.
If the ECU does not enter diagnostic mode, further testing may be required.
Do You Need a Repair Manual for Honda OBD1 Codes?
A repair manual is highly recommended.
The trouble code only tells you where to begin.
A repair manual provides:
- Code definitions
- Wiring diagrams
- Sensor testing procedures
- Voltage specifications
- Diagnostic steps
For example, a temperature sensor code may require checking resistance values, wiring continuity, and ECU input signals before replacing the sensor.
Accurate diagnosis saves money and prevents unnecessary parts replacement.
Can a Modern Scanner Read Honda OBD1 Codes?
Some advanced diagnostic tools can communicate with Honda OBD1 systems using special adapters or manufacturer-specific software.
However, a standard OBD2 code reader usually cannot read Honda OBD1 vehicles.
The communication system, connector design, and diagnostic protocols are different.
If you own an older Honda, check whether the scanner specifically supports Honda OBD1 before purchasing.
Final Thoughts
So, how to read OBD1 codes Honda vehicles is usually done by using the diagnostic service connector and counting the Check Engine Light flashes.
Locate the Honda service connector, activate diagnostic mode, turn the ignition on, and record the flash pattern to identify the stored trouble code.
Honda OBD1 systems are simpler than modern OBD2 systems, but the code is only the starting point. Proper testing is still necessary to determine whether the actual problem is a failed sensor, wiring issue, mechanical fault, or another engine-control problem.