To prime a windshield washer pump, fill the reservoir with the correct washer fluid, make sure the pump inlet and hoses are connected securely, then operate the washer in short bursts until fluid reaches the nozzles. If trapped air prevents flow, disconnect the pump outlet hose temporarily and run the pump briefly until a steady stream of fluid appears, then reconnect the hose.
For drivers in the United States, a working windshield washer system is especially useful during winter road-salt season, spring pollen, summer insects, and dusty highway driving. After the reservoir has run completely dry, a washer pump has been replaced, or a hose has been disconnected, air can remain in the system and prevent washer fluid from reaching the windshield even though the pump motor still runs.
Priming is simply the process of getting washer fluid back into the pump and pushing trapped air out of the washer lines. Most automotive washer pumps can restore their own fluid supply once the reservoir is filled, but stubborn air pockets, clogged screens, leaking hoses, incorrect pump installation, or frozen fluid can prevent normal operation. The procedure below starts with the easiest and safest method before moving to manual bleeding and troubleshooting.
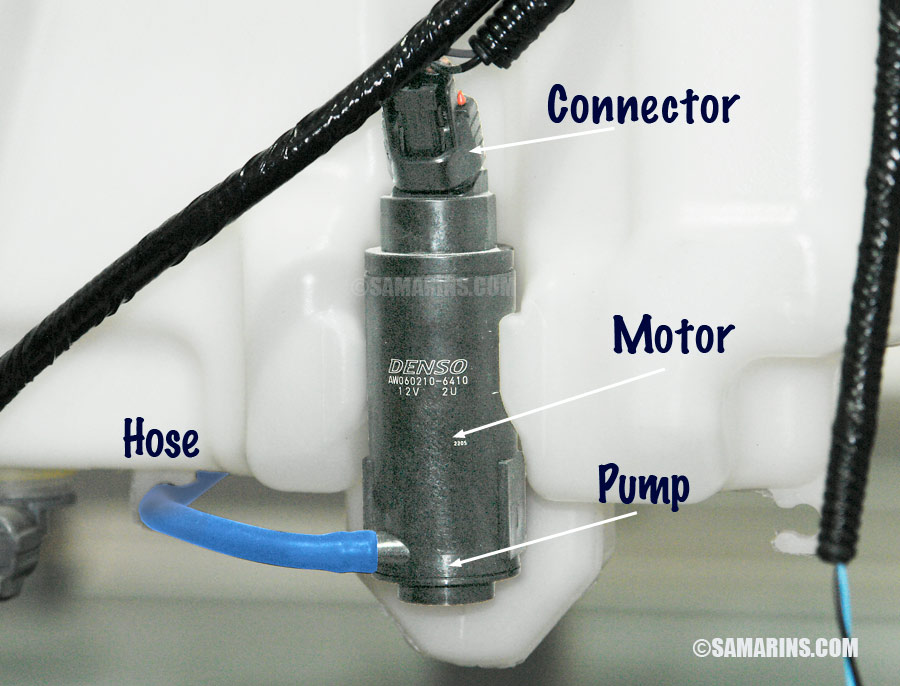
Priming a windshield washer pump means filling the pump and its supply path with washer fluid so the pump can move liquid instead of air. The pump normally draws fluid from the bottom of the washer reservoir and sends it through small hoses to the windshield nozzles.
When the reservoir runs dry or the pump, reservoir, or hoses are removed for repair, air can enter the system. A small electric washer pump is much better at moving liquid than pulling fluid through a system containing a large air pocket. Until the air is displaced, you may hear the motor running without seeing any spray.
Many systems recover simply by refilling the reservoir and activating the washer several times. Manual priming becomes useful when the fluid does not reach the pump or when an air pocket remains trapped at the outlet.
Source: grimmermotors.co.nz
Common reason for priming
The washer reservoir was allowed to run completely empty.
After pump replacement
A newly installed pump and empty hose can contain enough air to delay fluid delivery.
After hose repairs
Removing a washer hose can drain part of the system and introduce air.
After reservoir removal
Cleaning or replacing the washer reservoir usually leaves the pump inlet and lines empty.
Signs the Washer Pump May Need Priming
The strongest clue is a pump that can be heard running normally but produces little or no fluid immediately after the washer system has been emptied or serviced. You may also see a delayed spray, intermittent spurts, or bubbles moving through a transparent section of washer hose.
Priming is less likely to be the answer if the pump is completely silent, the fuse repeatedly fails, washer fluid pours onto the ground, or the system stopped working without ever being emptied or repaired. Those symptoms point toward electrical faults, leaks, blockages, freezing, or pump failure.
Pump hums but no fluid appears
An air pocket or restricted fluid supply is possible.
Spray appears after a delay
Air may still be moving through the washer hoses.
Fluid sputters from the nozzles
The lines may not yet be completely filled with washer fluid.
What You Need Before Priming the Washer Pump
Most vehicles require very few tools for basic priming. Start with the correct windshield washer fluid and enough fluid to place the reservoir safely above the pump inlet. Consult the vehicle owner’s manual if you are unsure about fluid requirements or reservoir location.
In freezing parts of the United States, use washer fluid rated for the temperatures your vehicle will encounter. Plain water can freeze in the reservoir, pump, hoses, or nozzles and should not be treated as a substitute for winter-rated washer fluid in cold weather.
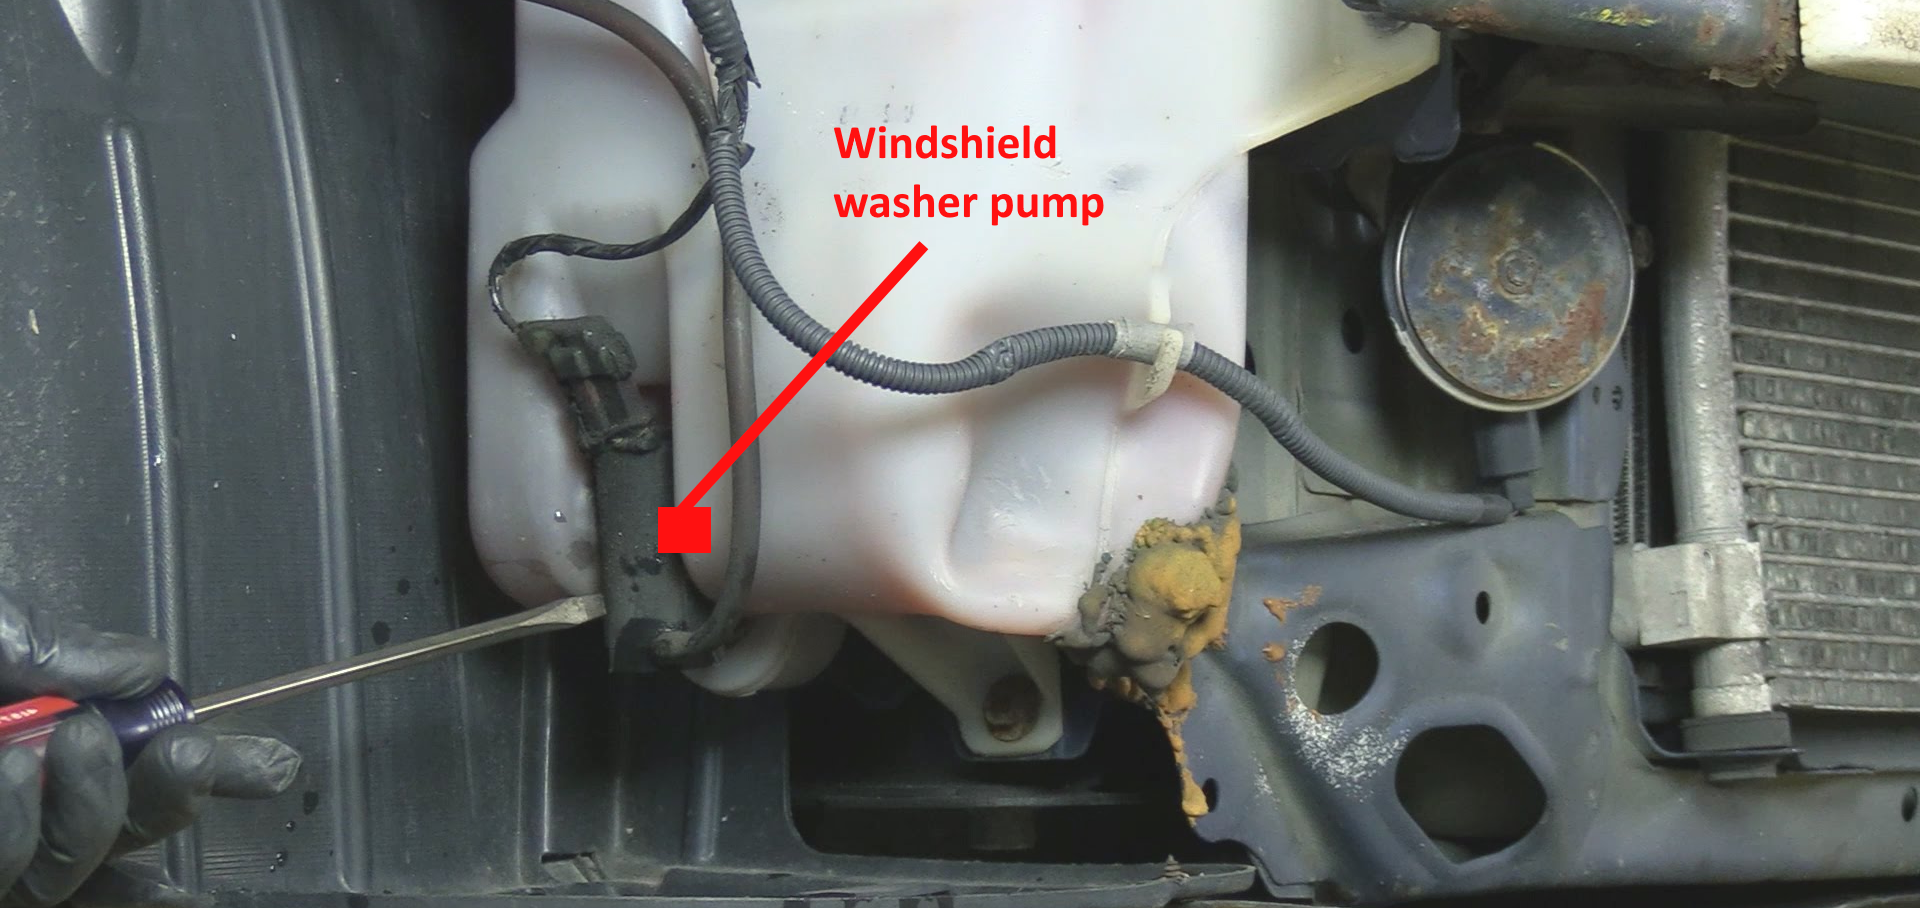
Park the vehicle on a level surface, switch the engine off while inspecting the reservoir and hoses, and keep hands, loose clothing, and tools away from belts, fans, and other moving components. Some vehicles may require removal of a wheel-well liner, splash shield, or other trim to reach the pump.
Source: diagraminfo.com
Windshield washer fluid
Use fluid appropriate for the vehicle and expected weather conditions.
Clean shop towel
Useful for catching small spills and keeping connectors clean.
Small pliers if needed
Some washer hoses use spring-style clamps that require careful removal.
Flashlight
Helps inspect the pump, reservoir, grommet, hoses, and fluid leaks.
Vehicle manual
Useful when pump access, fuse location, or washer-system design differs from the common layout.
Check the Reservoir Before Starting
Make sure the reservoir actually contains enough fluid. A low fluid level may leave the pump inlet uncovered, especially if the vehicle is parked on an incline. Look for cracks around the reservoir and wet areas around the pump grommet.
If the reservoir contains dirt, sludge, or unidentified fluid, correcting that contamination is more important than repeatedly operating the pump. Debris can block the pump inlet screen and washer nozzles.
Confirm fluid level
Do not assume the dashboard low-fluid warning is perfectly accurate.
Inspect for leaks
Fluid escaping around the reservoir or pump seal can prevent reliable priming.
Check for frozen fluid
Do not force a pump to operate against frozen washer fluid.
How to Prime Windshield Washer Pump Step by Step
Begin with the normal self-priming method because it requires no hose removal. The goal is to keep the pump supplied with fluid while operating it in short intervals until the air is pushed through the lines.
Do not continuously hold the washer switch for an extended period when no fluid is moving. Short activations give you time to listen to the pump, inspect for leaks, and avoid unnecessary heat buildup.
Source: youtube.com
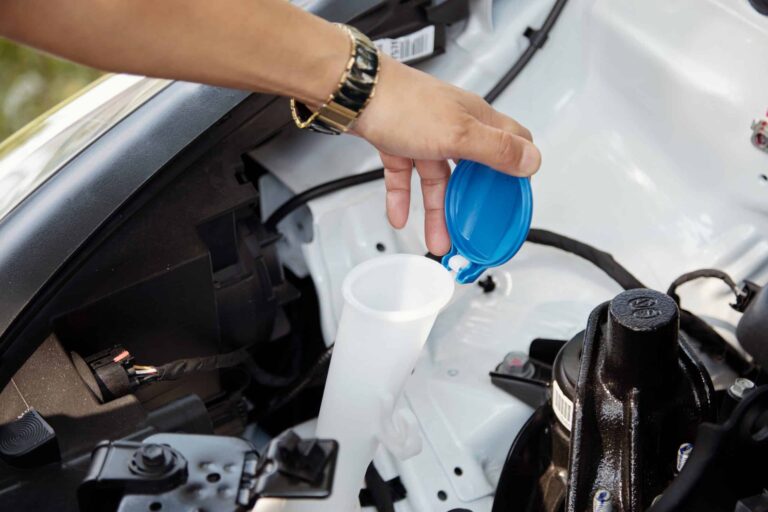
Step 1: Fill the washer reservoir
Add the appropriate windshield washer fluid until the reservoir contains enough fluid to keep the pump inlet submerged.
Step 2: Inspect the pump connections
Check that the electrical connector is seated, the pump is fully installed in its reservoir grommet, and the outlet hose is attached securely.
Step 3: Turn the ignition to the required position
Most vehicles require the ignition to be in the accessory, on, or running position before the washer switch will operate.
Step 4: Activate the washer briefly
Operate the windshield washer in short bursts and listen for the pump motor.
Step 5: Pause between attempts
Allow a short pause so fluid can settle toward the pump inlet and so you can check for leaks.
Step 6: Watch the nozzles
The first fluid may sputter or spray unevenly while remaining air leaves the lines.
Step 7: Continue until spray becomes steady
Once both windshield nozzles produce a consistent stream or fan pattern, the washer system is generally primed.
How Do You Know the Pump Is Successfully Primed?
A properly primed washer system responds quickly when the switch is activated. Fluid should reach the windshield without a long delay, and the spray should become consistent rather than alternating between air and fluid.
Unequal spray between the left and right nozzles does not automatically mean the pump is still unprimed. One nozzle may be partially clogged, a hose may be kinked, or a splitter fitting may be restricted.
Steady fluid delivery
Fluid reaches the windshield without repeated dry pump operation.
Normal pump sound
The motor sounds consistent rather than changing dramatically as air passes through.
No visible leaks
Fluid remains inside the reservoir, pump connections, hoses, and fittings.
How to Manually Prime a Windshield Washer Pump That Will Not Pick Up Fluid
If repeated short activations produce no fluid but the pump can be heard running, you can often remove trapped air by bleeding the outlet directly at the pump. This method is especially useful after replacing the washer pump or completely draining the reservoir.
Access varies widely by vehicle. On some cars the pump is visible from the engine compartment. On others it is mounted low on the reservoir behind the front bumper or wheel-well liner. Do not remove unrelated components unless you know the correct procedure for your vehicle.
Source: storage.googleapis.com
Step 1: Fill the reservoir
Make sure washer fluid is available above the pump inlet.
Step 2: Locate the pump outlet hose
Identify the small hose carrying fluid from the pump toward the windshield.
Step 3: Disconnect the outlet hose carefully
Pull the hose from the pump fitting without twisting or cracking an aged plastic outlet nipple.
Step 4: Position a towel or container
Washer fluid may discharge immediately once the pump begins moving liquid.
Step 5: Operate the washer briefly
Activate the pump in short bursts until fluid comes directly from the pump outlet.
Step 6: Wait for bubble-free flow
A consistent stream indicates that the pump chamber has filled and much of the trapped air has been removed.
Step 7: Reconnect the hose
Push the washer hose completely onto the pump outlet and reinstall any retaining clamp.
Step 8: Prime the remaining line
Activate the washer again in short bursts until fluid reaches the windshield nozzles.
Should You Pour Washer Fluid Directly Into the Pump?
Normally, no. Most vehicle washer pumps are designed to receive fluid from the reservoir, so manually pouring fluid into the electrical pump assembly is unnecessary and may create a mess or damage electrical components.
If fluid cannot reach the pump inlet naturally, investigate the reservoir outlet, inlet screen, grommet, or pump installation instead of attempting to force liquid into parts that were not designed to be filled manually.
Avoid electrical connectors
Do not pour washer fluid over wiring or connector terminals.
Do not pressurize the reservoir
Applying uncontrolled compressed air can damage hoses, fittings, or the reservoir.
What to Check If the Windshield Washer Pump Will Not Prime
A washer pump that refuses to prime usually has another problem preventing fluid movement. Troubleshooting is easier when you first determine whether the pump motor runs.
If you hear the pump, concentrate on the fluid path. If you hear nothing, concentrate on electrical power, the switch circuit, fuse protection, wiring, connectors, and the pump motor itself.
Source: autoowa.com
Empty or low reservoir
Add washer fluid and make sure the fluid level remains above the pump inlet.
Clogged pump inlet
Sediment or deteriorated washer fluid can restrict the screen or passage feeding the pump.
Loose pump grommet
A damaged seal can leak fluid or prevent the pump from sitting correctly in the reservoir.
Disconnected or split hose
The pump may move fluid normally while the liquid escapes before reaching the windshield.
Kinked washer line
A pinched hose can stop or severely reduce flow.
Blocked washer nozzle
A pump can be fully primed while clogged nozzles prevent visible spray.
Frozen washer fluid
Summer fluid or diluted fluid may freeze during cold US winters and block the pump, hoses, or nozzles.
Failed pump
A motor may run while a damaged internal impeller fails to move enough fluid.
Pump Runs but No Washer Fluid Comes Out
Disconnect the outlet hose at the pump and test briefly. Fluid flowing strongly from the pump outlet indicates that the pump is working and the restriction is farther downstream. Check the hose, one-way valves if equipped, splitter fittings, and washer nozzles.
If no fluid leaves the pump even with the outlet hose removed, confirm that fluid is reaching the pump inlet. A clogged reservoir screen, improperly installed pump, damaged grommet, frozen fluid, or worn pump can prevent pickup.
Good flow at pump
Troubleshoot hoses, fittings, check valves, and nozzles.
No flow at pump
Troubleshoot the reservoir outlet, inlet screen, pump installation, and pump condition.
Pump Is Completely Silent
Priming cannot correct a pump that is not receiving electrical power or cannot run. Check the appropriate fuse information for your vehicle, inspect the pump connector for corrosion or damage, and verify that the washer switch is being operated under the correct ignition conditions.
Electrical diagnosis beyond basic fuse and connector inspection may require a multimeter and the vehicle’s wiring information. If you are uncomfortable testing automotive circuits or access requires significant disassembly, a repair shop can diagnose the system without replacing parts unnecessarily.
Check the fuse
Use the vehicle manual because washer and wiper circuit arrangements vary by model.
Inspect the connector
Look for loose terminals, moisture, corrosion, or damaged wiring.
Verify voltage if qualified
Electrical testing can distinguish a failed pump from a circuit problem.
Common Mistakes to Avoid When Priming the Washer Pump
Priming is a simple procedure, but repeatedly running the pump without checking the rest of the system can turn a small washer problem into unnecessary parts replacement. Work through the fluid supply, pump operation, hoses, and nozzles in order.
The biggest practical mistake is assuming that every no-spray condition is caused by trapped air. Priming makes the most sense immediately after the reservoir has gone dry or the washer system has been opened for service.
Source: pinterest.com
Running the pump dry for too long
Use short activations and stop if the system does not begin moving fluid.
Ignoring frozen fluid
Let the vehicle and washer system thaw safely before trying to force fluid through frozen lines.
Using plain water in freezing weather
Use washer fluid with freeze protection appropriate for local winter temperatures.
Replacing the pump before checking hoses
A disconnected hose or clogged nozzle can mimic pump failure.
Using sharp objects aggressively on nozzles
Washer jets are small and can be damaged or misaligned by improper cleaning.
Forcing a brittle hose from a plastic fitting
Older washer hoses and pump outlets can crack, especially in cold weather.
Ignoring leaks after priming
A system that primes but quickly loses fluid may have a reservoir, grommet, hose, or fitting leak.
When to Stop Priming and Diagnose the System
Stop repeating the priming procedure if the pump remains dry after several short attempts, if the pump becomes unusually hot, if you smell overheated electrical insulation, or if the fuse fails. Continuing to operate a system with an underlying restriction or electrical fault is unlikely to solve the problem.
You should also move to diagnosis if the system repeatedly loses prime after working normally. A healthy closed washer system should not require routine priming. Repeated loss of fluid delivery can indicate a leak, loose connection, failing check valve where fitted, cracked hose, damaged reservoir, or deteriorating pump.
Repeated loss of prime
Look for a leak or component allowing fluid to drain back.
Electrical smell or excessive heat
Stop operating the pump and investigate the electrical or mechanical fault.
Persistent weak spray
Check restrictions and pump output instead of continuing to bleed air.
Frequently Asked Questions
Q
Does a windshield washer pump normally need to be primed?
Usually, a properly functioning washer system does not need routine priming. Priming is most commonly needed after the reservoir has run completely dry, the pump has been replaced, the reservoir has been removed, or a washer hose has been disconnected.
If the washer system repeatedly needs priming during normal use, check for leaks, loose hoses, damaged seals, restrictions, or a failing pump.
Q
How long does it take to prime a windshield washer pump?
A healthy system often begins moving fluid after a few short washer activations. The exact time varies with hose length, pump location, reservoir design, and how much air entered the system.
If there is still no sign of fluid after several short attempts, stop and inspect the system instead of continuously running the pump.
Q
Can an air lock stop a windshield washer pump from working?
Yes. Air trapped around the pump or in an empty supply path can temporarily prevent effective fluid movement, particularly after repairs or after the reservoir has been completely drained.
Disconnecting the outlet hose and allowing the pump to move fluid directly from the reservoir can help determine whether an air pocket is the problem.
Q
Why can I hear the washer pump but no fluid comes out?
Possible causes include trapped air, an empty reservoir, frozen washer fluid, a clogged inlet screen, a disconnected or split hose, blocked nozzles, a restricted fitting, or a pump whose motor runs but whose internal pumping mechanism is damaged.
Testing for fluid directly at the pump outlet is a useful dividing point. Good output there means the problem is likely downstream in the hoses or nozzles.
Q
Why does windshield washer fluid spray weakly after priming?
Weak spray after the air has cleared usually points to a restriction, leak, weak pump, partially clogged nozzle, kinked hose, or contaminated reservoir rather than incomplete priming.
Compare both nozzles. If only one is weak, the problem is more likely to be near that nozzle or its branch hose. If both are weak, investigate pump output and shared sections of the fluid path.
Q
Can I use water to prime a windshield washer pump?
For normal vehicle use, windshield washer fluid is the better choice because it is formulated for windshield cleaning and, depending on the product, freeze protection. Plain water can freeze and damage or block the washer system in cold conditions.
This is especially important for vehicles used in northern US states or mountain regions where freezing temperatures are common.
✦ Wrapping Up
Conclusion
Learning how to prime windshield washer pump systems is usually straightforward. Fill the reservoir with suitable washer fluid, confirm that the pump and hoses are connected correctly, and operate the washer in short bursts until fluid reaches the windshield. When an air pocket refuses to clear, disconnecting the pump outlet hose temporarily can allow the pump to fill with fluid before the hose is reconnected.
If the pump still will not move fluid, priming is no longer the main task. Check whether the pump runs, whether fluid reaches its inlet, whether fluid exits the pump directly, and whether the hoses and nozzles are clear. That simple sequence helps separate an air-lock problem from a blockage, leak, electrical fault, frozen system, or failed pump.
💡 Key Takeaway
Start with a full reservoir and short washer-switch activations. If no fluid appears, test directly at the pump outlet before replacing components.
Learn how to fold a pop up windshield sun shade safely and quickly. Follow simple steps, avoid common mistakes, and store your car sun shade without damaging its frame.
Learn how to fold a round windshield sun shade correctly without bending the frame. Follow these simple steps, avoid common mistakes, and store it neatly.