Where to Plug in Obd2 Scanner: What to Know and Why It Matters
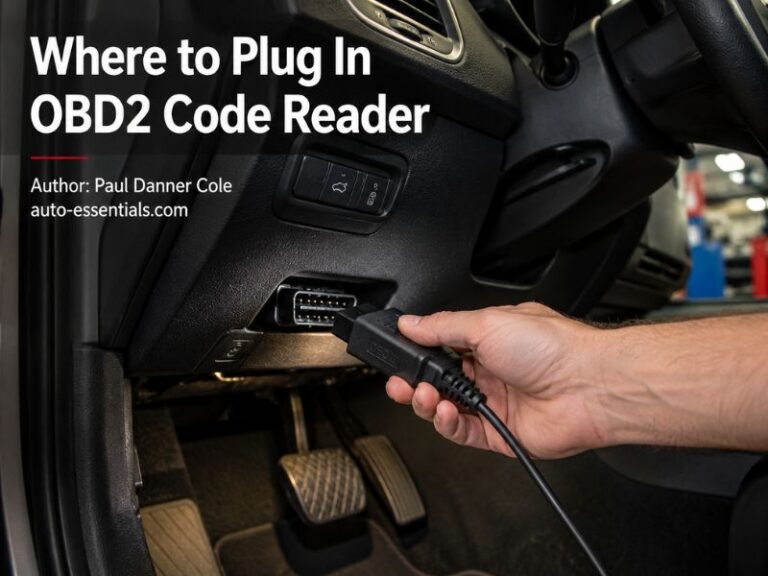
Most OBD2 scanners plug into the vehicle’s 16-pin diagnostic connector under the driver’s side dashboard, usually near the steering column, fuse box, or lower dash panel. The port is commonly visible from the driver’s seat, although it may sit behind a small cover or slightly above the pedals.
Finding the connector is usually simple; knowing whether it is the right port, whether the scanner should power on, and what a scan can actually prove is where confusion begins. A loose connection, blown fuse, low battery, aftermarket equipment, or a vehicle that does not use standard OBD2 can make a correct-looking setup seem faulty.
This article explains the connector’s usual location, how to identify its trapezoid-shaped socket, and the safest way to connect and use a scanner. You will also learn what to check when the scanner will not turn on, which vehicles may require an adapter or different tool, and when a diagnostic code should be treated as a clue rather than a final diagnosis.
Where the OBD2 Port Is Usually Located
In most cars and light trucks sold in the United States, the OBD2 port is inside the passenger compartment on the driver’s side. Federal OBD requirements generally apply to 1996 and newer gasoline vehicles and many diesel vehicles, so older vehicles may not have this standardized connector.
The port is normally within easy reach of the driver and no more than about three feet from the steering wheel. It is often mounted beneath the dashboard, below the instrument cluster, or near the left side of the steering column.
Common locations include:
- Under the lower edge of the dashboard, directly above the pedals
- Below or beside the steering column
- Near the interior fuse panel
- Behind a removable trim cover or small access door
- In the lower center area of the dashboard on some vehicles
- Near the driver’s knee bolster or kick panel
Some manufacturers place the connector farther toward the center console or mount it upside down. Its position can vary between model years, body styles, and trim levels, even within the same vehicle line.
How to Identify the Correct Connector
A standard diagnostic connector has a distinctive 16-pin trapezoid shape. It may be black, white, gray, or another color, and it may have a protective cap labeled “OBD,” “DLC,” or “diagnostic.” DLC stands for data link connector, another common name for the socket.
The connector is usually wider at one end than the other, which helps prevent the scanner plug from being inserted upside down. Look for two rows of small terminal openings inside the socket. Do not confuse it with a USB port, a 12-volt accessory outlet, a wiring harness plug, or a service connector intended for a separate vehicle system.
The correct port should be firmly mounted rather than hanging loose from a bundle of wires. A loose socket can still be the right connector, but it may indicate broken mounting clips, previous repair work, or strain on the wiring.
If the connector is difficult to see, use a flashlight and inspect the area under the dash without pulling aggressively on trim or wiring. The owner’s manual may show the precise location, and a repair-information label or fuse-panel diagram may identify it as the diagnostic connector.
How to Plug In an OBD2 Scanner
Connecting a scanner does not usually require tools. Set the vehicle on a level surface, place the transmission in Park or Neutral as appropriate, apply the parking brake, and make sure the scanner cable will not interfere with the pedals.
- Turn the ignition off before inserting the scanner unless the scanner manufacturer gives different instructions.
- Locate the 16-pin diagnostic connector under the driver’s side dash.
- Align the scanner plug with the connector’s trapezoid shape.
- Push the plug straight into the socket using gentle, even pressure.
- Turn the ignition to the “on” position without starting the engine if the scanner instructs you to do so.
- Allow the scanner to power up and communicate with the vehicle.
Most basic scanners receive power through the diagnostic connector, so a powered device usually indicates that at least some connector circuits are working. Advanced scan tools may also use Bluetooth, Wi-Fi, or a separate app, but the physical vehicle connection remains the same unless the device is a wireless plug-in adapter.
Never force the connector. If it does not slide in with light pressure, check the orientation and inspect the socket for a bent terminal, debris, a damaged housing, or an obstruction from a trim panel.
Should the Key Be On or the Engine Running?
For reading trouble codes, the ignition is commonly switched to key on, engine off. This powers the vehicle’s control modules without the engine running and avoids unnecessary movement, exhaust, and heat while you are connecting the tool.
Some scanners can establish communication with the key off, while others require the ignition on. Follow the instructions for the specific scanner and vehicle. Starting the engine is generally unnecessary for a basic code check.
Keep the engine off when working in a closed garage. If a live-data test requires the engine to run, use adequate ventilation, keep clear of belts and fans, and ensure the cable is routed away from the accelerator and brake pedals.
Do not disconnect the scanner while it is writing settings, performing a module test, or updating vehicle software. A simple code-reading session is normally low risk, but interrupting a programming operation can create a more serious problem.
What the Scanner Can and Cannot Tell You
An OBD2 scanner reads information stored by the vehicle’s powertrain control module and, depending on the tool and vehicle, other electronic modules. The most familiar result is a diagnostic trouble code, or DTC, associated with an illuminated check-engine light.
A code does not automatically identify the failed part. For example, a code related to an oxygen-sensor circuit may result from a failed sensor, damaged wiring, an exhaust leak, a power-supply problem, or another condition affecting the measured signal.
The scanner may also display:
- Stored, pending, or permanent trouble codes
- Freeze-frame data captured when a fault occurred
- Emissions readiness monitors
- Engine speed, coolant temperature, fuel trims, and other live data
- Vehicle identification information
- Whether the malfunction indicator lamp is commanded on
Basic code readers often access only standardized engine and emissions information. A more capable diagnostic tool may communicate with the transmission, airbag, anti-lock brake, body, or other modules, but coverage varies by brand, model, software version, and tool.
Clearing a code turns off the warning light in many situations, but it does not repair the underlying fault. It can also erase valuable freeze-frame information and reset emissions monitors, making the vehicle temporarily appear “not ready” for an emissions inspection.
What to Check If the Scanner Will Not Power On
A scanner that remains blank does not necessarily mean the vehicle lacks OBD2. The connector normally includes a power circuit, and that circuit may be protected by a fuse shared with the cigarette lighter, accessory socket, interior electronics, or another system.
Check the following in order:
- Confirm that the scanner’s cable or wireless adapter is switched on and functioning.
- Make sure the plug is fully seated and aligned correctly.
- Try the ignition in the on position with the engine off.
- Inspect the vehicle’s diagnostic or accessory fuse using the owner’s manual.
- Look for bent, pushed-back, corroded, or damaged terminals.
- Test the scanner on a known-compatible vehicle if possible.
- Check the vehicle battery if electrical power is weak or other electronics act abnormally.
Do not replace a fuse with a higher-rated fuse, metal object, or improvised jumper. If the replacement fuse blows again, stop testing and have the circuit inspected because a short circuit or damaged wiring may be present.
A vehicle can sometimes communicate with a scanner even when one connector circuit is damaged, while another vehicle may show no power at all. If the scan tool powers up but reports “no communication,” the problem may involve the vehicle’s communication network, ignition power, a module fault, an incorrect protocol, or a tool that does not support the vehicle.
Vehicles That May Not Use a Standard OBD2 Setup
Most modern U.S.-market passenger vehicles use a standard 16-pin OBD2 connector, but not every vehicle with a similar-looking port supports every scanner function. A vehicle built before the OBD2 era may use an older manufacturer-specific connector or may not provide standardized diagnostic access.
Motorcycles, recreational vehicles, imported models, heavy-duty trucks, and specialty equipment can use different connectors or communication systems. Some may require a brand-specific adapter cable, while others need a dedicated diagnostic tool rather than a generic code reader.
Even when a 16-pin socket is present, its accessibility and capabilities can differ. A scanner may read generic engine codes but fail to access manufacturer-specific body or chassis modules. Check the scanner’s compatibility information using the vehicle’s year, make, model, engine, and market.
Do not assume that an adapter is safe merely because it physically fits. The adapter must be designed for the vehicle and the diagnostic tool. An incorrectly wired adapter can damage the connector, scanner, or vehicle electronics.
Safety and Connection Mistakes to Avoid
The diagnostic port is low-voltage, but careless handling can still cause electrical damage or create a driving hazard. Keep metal tools, jewelry, liquids, and loose objects away from the exposed terminals.
- Do not probe random terminals with a wire or test light.
- Do not force a plug into a socket with the wrong shape or orientation.
- Do not leave a cable where it can catch on the brake or accelerator pedal.
- Do not scan while the vehicle is moving unless a qualified person is operating the tool safely.
- Do not remove panels or wiring if you are unsure which components are connected to airbags.
- Do not clear codes repeatedly before recording them and checking the cause.
Some inexpensive plug-in adapters remain powered after the vehicle is parked. Leaving one connected for long periods can contribute to battery drain, particularly if the adapter has poor sleep behavior or the vehicle is not driven frequently.
If the port is wet, burned, corroded, visibly damaged, or hot to the touch, disconnect the scanner and do not continue. A professional can inspect the connector and test its power, ground, and communication circuits safely.
When Professional Diagnosis Is the Better Choice
A scanner is useful for identifying fault information, but it cannot replace electrical testing, mechanical inspection, or manufacturer-level diagnostics. Professional help is appropriate when the vehicle has multiple warning lights, stalls, loses power, overheats, or shows symptoms that could affect braking, steering, or airbag operation.
Seek assistance if the connector is missing, broken, pushed behind the dashboard, or surrounded by modified wiring. A previous owner may have installed an alarm, remote starter, tracking device, audio system, or other equipment near the diagnostic circuit.
Professional diagnosis is also wise when a code returns immediately after clearing, when the tool cannot communicate with any module, or when the vehicle will not pass an emissions readiness check. The technician can verify the fault instead of replacing parts based only on a code description.
FAQ About Where to Plug in OBD2 Scanner
Where do you plug in an OBD2 scanner?
Plug it into the 16-pin diagnostic connector under the driver’s side dashboard. The socket is usually near the steering column, lower dash, interior fuse panel, or pedals. It may be covered by a small removable cap.
Can I find the OBD2 port under the hood?
Usually, no. Standard OBD2 ports in U.S.-market cars are generally inside the cabin near the driver, not in the engine compartment. Older or specialty vehicles may use a different diagnostic connector and location.
How do I know which plug is the OBD2 port?
Look for a 16-pin socket with a trapezoid outline. It should be firmly mounted under the dash and may be labeled “OBD,” “DLC,” or “diagnostic.” Do not use a connector that has a different shape or is part of a loose wiring harness.
Should the car be off when plugging in the scanner?
Turn the ignition off while inserting the plug, then switch the ignition on for scanning. Many code readers use the key-on, engine-off position to communicate with the control modules. Follow the scanner’s instructions if they differ.
Why does my OBD2 scanner have no power?
Check the plug, ignition position, vehicle fuse, connector terminals, and scanner itself. The diagnostic port often shares a fuse with an accessory outlet, so a blown fuse can prevent the tool from powering up.
Can an OBD2 scanner be plugged in while driving?
It can be physically connected, but it should not create a distraction or pedal hazard. Keep the cable secured and avoid handling the tool while driving. Live-data testing is safer with a second person operating the scanner or with professional equipment.
Does every car use the same OBD2 port?
Most 1996-and-newer U.S. cars and light trucks use the same 16-pin format, but functions vary. Older vehicles, motorcycles, specialty vehicles, and some imported models may require a different connector, adapter, or manufacturer-specific scanner.
Conclusion: Find the Port, Then Verify the Problem
The OBD2 scanner normally plugs into the 16-pin trapezoid-shaped port beneath the driver’s side dashboard, often near the steering column or fuse panel. Insert it gently with the ignition off, switch the key on when prompted, and record codes before clearing anything.
The main limitation is that a trouble code points to a system or circuit rather than automatically naming a failed part. If the scanner has no power, the port is damaged, communication fails, or serious warning symptoms are present, check the fuse and compatibility first, then arrange a professional diagnosis.