Welding Machine Accessories and Parts: Types, Uses, and Care
Welding machine accessories and parts help you control the arc, connect the work, feed wire or shielding gas, and protect yourself. The right setup depends on your welding process, machine, and materials, while worn or mismatched parts can cause poor welds and unsafe conditions.
Are you chasing an unstable arc that comes and goes, or trying to figure out whether a frayed cable is still safe to use? Sorting out accessories from actual machine parts can save you from buying the wrong item and wasting a Saturday on a problem that started with a loose connection.
I once spent a frustrating stretch troubleshooting a rough weld before noticing that a small contact part in the torch had worn down. I’d focused on machine settings and overlooked the part that carried current right to the wire. It’s a common mistake, not a dumb one.
I wrote this for anyone setting up a welder, maintaining a home shop, or replacing a part without wanting to guess. You’ll get a clear picture of what common accessories do, which parts match each process, and what signs mean it’s time to stop and inspect your setup.
Getting the details right can mean steadier welds, fewer wasted consumables, and less chance of an electrical or burn hazard. Skip inspection, and a damaged cable, blocked gas path, or badly fitted part can turn a simple job into a frustrating—and potentially dangerous—one.
This takes about 14 minutes to read. By the end, you’ll be able to:
- Match common accessories to MIG, TIG, and stick welding.
- Spot the parts that affect arc quality and current flow.
- Check wear and make sensible replacement choices.
- Know when a repair belongs with a qualified service technician.
Welding Machine Accessories and Parts: What You Need
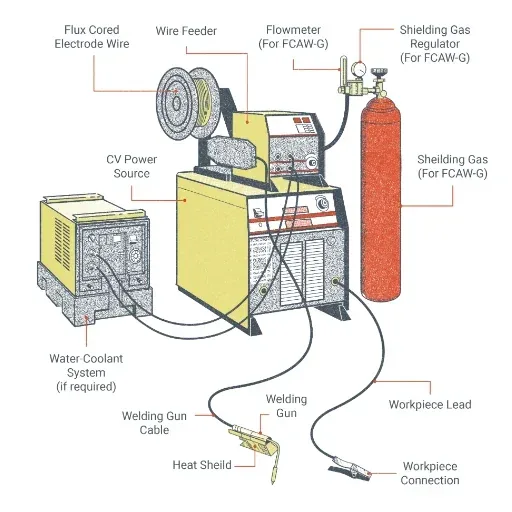
Welding machine accessories and parts include the removable gear used to weld and the components that make the machine work. A sound setup matches the process, connects securely, and uses undamaged parts; a MIG welder, for instance, needs a suitable wire-feeding system and torch parts, while stick welding uses an electrode holder.
An accessory is a separate item used with a welder, such as a helmet, torch, work clamp, or gas regulator. A machine part is a component inside the welder or its attached system, such as a circuit board, fan, drive roll, or contact tip. Some items sit in a gray area: a welding gun is removable gear, but its liner and trigger are replaceable components.
Start by identifying the process, machine model, and material you’re working with. MIG, TIG, and stick setups share some equipment, but their torches, consumables, and connections aren’t interchangeable just because they look close.
A MIG job on mild steel may use a spool of solid wire, a contact tip, shielding gas, and a work clamp. A stick weld uses a coated electrode held in an electrode holder, so it doesn’t need a wire-feed system or MIG contact tip.
The main groups to sort out are:
- Power and connections: welding cables, plugs, connectors, work clamps, and the machine’s input connection.
- Process gear: MIG guns, TIG torches, electrode holders, wire feeders, and gas equipment.
- Consumables: contact tips, nozzles, liners, tungsten electrodes, filler rods, and stick electrodes.
- Protection and handling: welding helmet, gloves, jacket, clamps, brushes, and chipping tools.
- Machine components: drive rolls, fans, switches, internal wiring, circuit boards, and other service parts.
Do you need every accessory at once? No. Buy the items needed for your process first, then add useful extras such as a spare nozzle, a wire brush, or a second work clamp as your projects demand them.
Before spending money, check the welder’s manual and the labels on the machine and existing accessories. Match the connector type, process, wire diameter, electrode size, and rated capacity where those details apply. Two parts can look nearly identical and still have different threads, fit, or electrical ratings.
Pro Tip: Keep the model name and serial number of your welder with your maintenance notes. Those details make it much easier to identify compatible replacement parts when the old piece is too worn to read.
Match Accessories to Your Welding Process
The correct accessories depend on how the machine delivers current and filler material. MIG, TIG, and stick each use a different path to the weld, so the torch or holder and its consumables need to suit the process.
MIG accessories for wire welding
A MIG welding gun, also called a welding torch, feeds wire and shielding gas while carrying welding current to the work. Common gun parts include the trigger, liner, contact tip, nozzle, and neck. If you’re comparing the different ways a welder holds or directs the arc, welding guns, torches, and electrode holders cover the distinctions.
The contact tip transfers current to the wire as the wire passes through it. Its bore needs to match the wire diameter; a loose, worn tip can make the arc inconsistent, while a damaged or clogged tip can interfere with feeding.
A wire liner guides wire through the gun cable. A kinked or dirty liner can add drag, making the wire feed surge or stop. A nozzle directs shielding gas over the weld area, and spatter buildup inside the nozzle can disrupt that coverage.
MIG setups may also use a drive roll, the wheel that grips and pushes wire through the feeder. Drive rolls have different grooves or shapes for different wire types and sizes, so the correct roll matters. If wire slips or gets flattened, check the roll setup and tension before cranking the pressure tighter.
The shielding gas system can include a cylinder, regulator, flowmeter, hose, and fittings. These parts control and deliver gas to the torch, but a gauge reading alone won’t prove gas is reaching the weld. A loose fitting, kinked hose, clogged nozzle, or draft blowing across the work can all spoil shielding.
TIG accessories for precise arc control
A TIG torch holds the tungsten electrode and directs shielding gas around the arc. Depending on the torch design, its parts can include a collet, collet body, back cap, cup, and power cable. The collet grips the tungsten; the cup helps shape gas coverage.
TIG welding uses a tungsten electrode to create the arc. The tungsten doesn’t melt into the weld as filler, though filler rod can be added separately when the joint needs it. A blunt, contaminated, or incorrectly prepared tungsten can make arc control harder, so match its type and size to the machine setup and job.
TIG torches can be air-cooled or water-cooled. Water-cooled systems need their cooling equipment set up and working as intended; running a torch without required cooling can damage it. Read the torch and machine instructions before connecting cooling lines or changing a torch configuration.
Stick welding accessories for coated electrodes
A stick setup uses an electrode holder, often called a stinger, to grip the coated electrode and carry current. The holder connects to a welding cable and should grip the rod firmly without damaged insulation or loose jaws. The work clamp completes the electrical path through the workpiece.
Stick electrodes come in different types and sizes for different jobs and welding positions. Store them according to the electrode maker’s directions, since some rods need dry storage to perform as intended. Don’t try to solve a damp-electrode problem by turning up the machine; follow the product instructions instead.
The table gives you a quick way to compare common gear without mixing parts across processes.
| Item | Main use | Common wear clue | Check before buying |
|---|---|---|---|
| MIG contact tip | Transfers current to wire | Wire feed or arc becomes inconsistent | Wire diameter and gun compatibility |
| MIG liner | Guides wire through gun | Wire drag, bird-nesting, or feed trouble | Gun model and wire type |
| MIG nozzle | Directs shielding gas | Heavy spatter or poor gas coverage | Gun fit and nozzle style |
| TIG collet | Holds tungsten in torch | Loose or uneven tungsten grip | Tungsten diameter and torch type |
| TIG cup | Shapes gas coverage | Cracks, chips, or damaged threads | Torch and collet-body fit |
| Stick holder | Grips electrode and carries current | Loose grip, cracked insulation, hot connection | Cable connection and rated capacity |
| Work clamp | Connects welding circuit to work | Weak grip, damaged cable lug, poor contact | Cable size and connection style |
| Welding cable | Carries welding current | Cuts, soft spots, heat damage, or exposed conductor | Required capacity, length, and connector |
| Helmet lens | Protects eyes during welding | Cracks, poor visibility, or unreliable auto-darkening | Lens shade range and helmet model |
Can you use a similar-looking torch part from another brand? Sometimes, but visual similarity isn’t a reliable fit check. Confirm the model, thread, dimensions, and machine instructions first; a poorly fitting part can leak gas, feed wire badly, or fail to make a solid electrical connection.
Inspect Accessories and Replace Worn Parts Safely
Routine inspection catches many accessory problems before they cause a bad weld or a safety risk. Look over cables, connectors, torch parts, gas hoses, and protective gear before welding, then clean and store them so damage doesn’t go unnoticed.
Before changing parts, turn the welder off and follow the machine instructions for disconnecting power. Let hot parts cool before handling them, and close the shielding-gas cylinder valve before disconnecting gas equipment. Never open the machine’s case to inspect internal components unless you’re qualified and the manual permits the work; capacitors and electrical parts can remain hazardous after power is removed.
Use a simple check, in order:
- Check the machine and accessory labels. Confirm the process, connection type, and compatible wire, electrode, or torch parts.
- Inspect the outside of cables and hoses. Look for cuts, crushed spots, cracked insulation, leaks, or areas that have become soft or unusually stiff.
- Check the connections. Look for loose plugs, damaged threads, discoloration, burn marks, or signs of overheating.
- Inspect process consumables. Check contact tips, nozzles, liners, tungsten, cups, and holders for wear, buildup, cracks, or poor fit.
- Check your protective gear. A helmet, gloves, and clothing must be in usable condition and suited to the job.
- Replace damaged parts with compatible parts. If the right match is unclear, stop and check the manual or ask the manufacturer or a qualified welding supplier.
I once kept working after noticing a connector that felt warmer than usual, thinking a brief pause would sort it out. The connection needed attention, and continuing to weld would only have added heat and wear. A warm plug or clamp isn’t a good reason to carry on; stop, shut down safely, and find the cause.
Cables and connectors carry welding current, so loose or damaged connections can create excess heat and unstable performance. The cable length, connector fit, and work clamp all matter; the practical guide to welding cables and connectors can help you match those pieces to the setup.
A work clamp should grip clean, solid metal close enough to the weld to make a reliable circuit. Paint, rust, scale, or a loose jaw can interfere with contact. Don’t clamp onto a painted panel and assume the current will find its way through; clean a suitable contact area first.
Watch for these signs that a part needs attention:
- A cable has exposed wire, deep cuts, melted areas, or a damaged connector.
- A hose is cracked, kinked, loose at a fitting, or leaking.
- A torch trigger sticks, a holder won’t grip, or a connection shows heat damage.
- A contact tip, cup, or nozzle is worn, blocked, cracked, or badly spattered.
- Your helmet lens, gloves, or jacket are damaged enough to leave skin or eyes exposed.
Don’t weld through a suspected gas leak. Shut off the cylinder valve, keep ignition sources away, and follow the gas supplier’s instructions for safe handling; if you can’t identify or correct the problem safely, leave the equipment alone and get qualified help. A leak isn’t a “finish this one bead first” situation.
Important Tip: Treat a damaged cable or connector as a repair issue, not a cosmetic one. Tape over a damaged outer covering doesn’t restore the cable’s current-carrying ability or make an unsafe connection safe.
Know what you can replace yourself
Many external consumables are designed for routine replacement, but the exact method depends on the machine and accessory. A contact tip, nozzle, tungsten, or electrode is usually a different kind of job from replacing a wire feeder motor or working on internal power electronics.
Replacement parts for the machine itself can include switches, fans, circuit boards, relays, and internal wiring. Those parts may affect the machine’s electrical safety, cooling, or power delivery. The welding machine replacement parts guide is a useful place to sort routine wear items from parts that call for qualified service.
Don’t guess at an internal repair based on a video or a part that looks similar. Use the machine’s documentation to identify the part and service requirements, and contact a qualified technician if the repair involves internal wiring, power electronics, or uncertainty about safe isolation.
Fix Common Accessory Problems Without Guessing
A welding problem often starts with a worn or poorly fitted accessory, but the same symptom can have several causes. Check the simplest external items first, such as the work clamp, cable connections, consumables, and shielding gas path, before changing machine settings.
| Symptom | Possible accessory issue | First safe check |
|---|---|---|
| MIG wire feeds unevenly | Worn tip, dirty liner, wrong drive roll, or poor roll tension | Check wire path and consumable fit with the machine off |
| MIG weld has pores | Gas flow problem, nozzle blockage, loose hose, or draft | Check the gas path and shield the work from airflow |
| TIG arc wanders | Contaminated tungsten, poor electrode fit, or bad connection | Inspect tungsten and torch parts after cooling |
| Stick arc feels erratic | Poor work contact, loose cable, or worn holder | Check clean contact points and connections |
| Connection gets unusually warm | Loose or damaged connector, poor contact, or unsuitable cable | Stop welding and inspect after safe shutdown |
| Torch or holder feels uncomfortable | Damaged insulation, heat, or poor handling fit | Stop, allow cooling, and check the accessory |
MIG wire that stutters doesn’t always mean the welder is failing. Check whether the wire spool turns freely, the liner suits the wire, the contact tip is the correct size, and the drive rolls are set correctly. If the wire bunches up at the feeder, stop rather than forcing more wire through.
Porosity means small holes or voids in the finished weld. A broken gas hose or a clogged nozzle may be part of the problem, but drafts and dirty base metal can also interfere with shielding. If the gas setup appears sound, check the work area and surface prep before replacing a machine part.
A TIG arc that wanders may point to contaminated tungsten, an electrode that doesn’t fit the collet properly, or a connection problem. Stop the arc and let the torch cool before inspecting the parts. Don’t touch a hot cup or tungsten with bare fingers.
For stick welding, an erratic arc can come from poor electrical contact as well as rod choice or machine settings. Check the work clamp’s contact area and the holder’s grip, then review the machine instructions for suitable electrode settings. If the cable or holder shows damage, don’t keep welding while you troubleshoot.
Change one thing at a time and make a short test weld on suitable scrap when the setup is safe. If you swap the tip, adjust the gas, move the clamp, and change the settings all at once, you won’t know which change fixed the problem. That’s how a small nuisance turns into a guessing game.
If a symptom continues after external checks, or the welder trips, smokes, smells burnt, or makes unusual electrical noises, stop using it. Unplug it if the manual says that’s the safe step, keep the machine out of service, and get qualified service rather than opening the case.
- Match each accessory to the welding process, machine, and consumable size.
- Stop and inspect any cable, hose, or connector that shows damage or unusual heat.
- Replace worn external consumables with compatible parts, not lookalikes.
- Leave internal electrical repairs to someone qualified to work on the machine.
FAQs About Welding Machine Accessories and Parts
What accessories do I need for a welding machine?
The accessories depend on the process. A MIG setup needs a compatible gun and wire-feeding system, while a TIG setup needs a torch and tungsten, and stick welding needs an electrode holder. All three need a suitable work connection and protective gear.
Check your machine instructions before buying parts.
How often should I replace welding machine accessories?
There isn’t one replacement schedule for every welding accessory. Contact tips, nozzles, electrodes, and other consumables wear with use, while cables and protective gear need replacement when damaged. Inspect before each job, and follow the maintenance intervals and replacement instructions for your specific machine and accessories.
Can I use any welding torch with my welding machine?
No. A torch must match the welding process and fit the machine’s connections and operating requirements. A torch that looks similar may have different fittings or cooling needs.
Check the welder and torch manuals for compatible models before connecting a replacement.
Why does my welding cable get hot?
A welding cable or connector can get hot because of a loose or damaged connection, poor contact, or a setup that doesn’t suit the equipment. Stop welding if the cable or plug feels unusually warm, then shut down safely and inspect it. Don’t cover damage with tape and keep working.
Are welding consumables and machine parts the same thing?
No. Welding consumables are items used up or worn during normal welding, such as wire, electrodes, and contact tips. Machine parts are components that make the welder or its attached equipment function, such as fans or drive rolls.
Some external accessory parts can be replaced routinely, while internal machine parts may need qualified service.
Build a Setup You Can Trust
Good welding machine accessories and parts make your work easier when they fit the process and stay in sound condition. A steady arc isn’t just about turning knobs; the torch, cables, work connection, consumables, and gas path all need to do their jobs.
In my view, careful matching and a quick pre-weld inspection beat buying a pile of spare gear “just in case.” Keep the machine manual handy, replace damaged items before the next job, and don’t open the welder if you aren’t qualified to service its internal parts.
Your clearest next step is to identify your welder’s model and process, then check each accessory against the manual and the labels on the equipment. That small check can save you from a wrong-fit part, a frustrating weld, and a repair that could have been avoided.