To install a rear windshield, remove the damaged glass, prepare the window opening, apply the correct automotive glass adhesive or seal, position compatible replacement glass, reconnect electrical parts, and follow the required curing time. Because rear glass can shatter suddenly and improper bonding can cause leaks or other safety problems, professional installation is the safest choice for most modern vehicles.
In the United States, a broken rear windshield can leave your car exposed to rain, theft, road debris, and changing weather. The rear window, also called the back glass, may include electric defroster lines, an antenna, a camera-related component, or a connection to other vehicle systems. Replacing it requires more than placing a new piece of glass into the opening.
The correct method depends on the vehicle’s make, model, year, and window design. Many modern cars use bonded back glass, while some older vehicles and pickup trucks use rubber gaskets or sliding window assemblies. These designs require different tools, seals, and installation methods, so identify the original setup before buying replacement glass.
This guide explains how rear windshield installation works, which supplies are needed, how to prepare the vehicle, and what to check after the glass is fitted. It also explains when a trained auto glass technician should take over. The goal is to help you make an informed repair decision and avoid mistakes that can damage the vehicle or compromise occupant safety.
A rear windshield is the glass panel fitted across the rear of a passenger vehicle. It helps protect the cabin from wind and weather while providing visibility through the back of the vehicle. Depending on the design, it may also support an electric defroster, an antenna, or other integrated features.
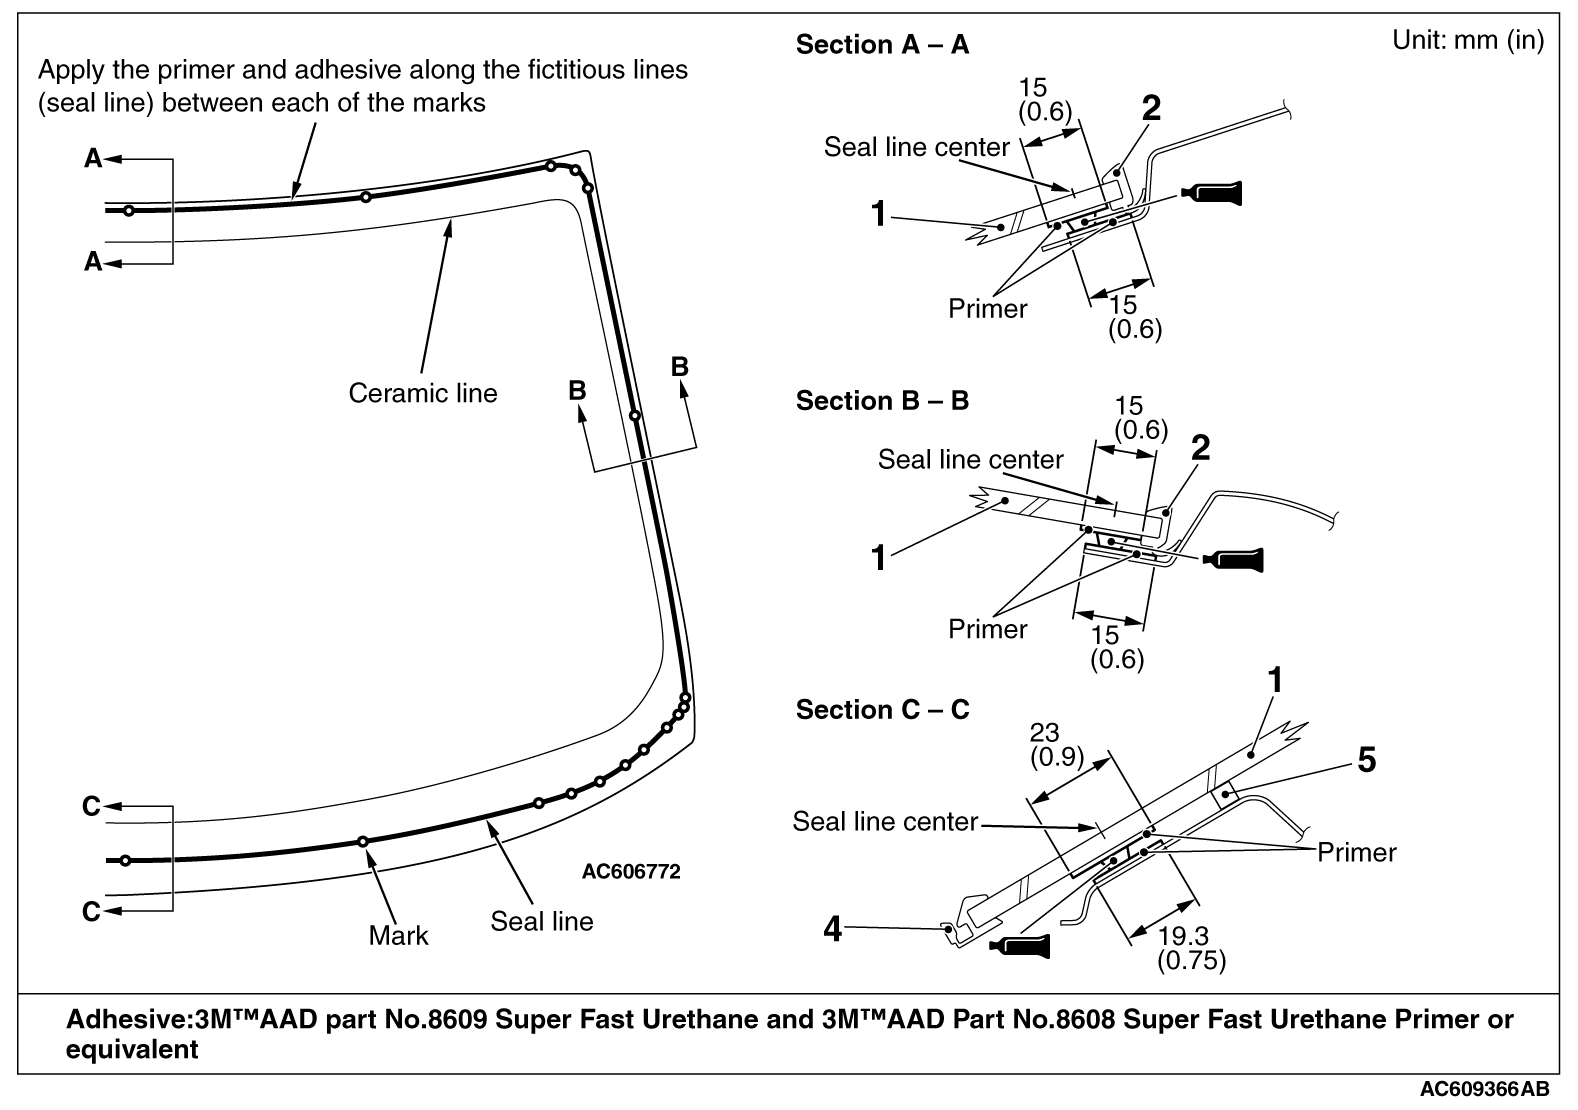
Before learning how to install rear windshield glass, identify how the original glass attaches to the body. A bonded window uses a specially designed automotive adhesive to secure the glass to the vehicle’s body opening. A gasket-mounted window relies on a rubber seal, while a sliding truck window may use a frame, tracks, and mechanical fasteners.
These systems are not interchangeable. A seal intended for a gasket-mounted window cannot replace structural glazing adhesive on a bonded installation. Likewise, ordinary household silicone is not a suitable substitute for an automotive adhesive specified by the vehicle manufacturer.
Source: uploads.bmw2002faq.com
Bonded rear glass
Common on many modern passenger cars and SUVs. It requires suitable glass adhesive, careful surface preparation, controlled positioning, and a specified curing period.
Gasket-mounted rear glass
Found on certain older vehicles and specific designs. It uses a compatible rubber gasket and a model-specific fitting procedure.
Sliding pickup rear window
Uses a framed assembly that may have tracks, latches, fasteners, and perimeter seals. Follow the instructions for the complete assembly rather than treating it like bonded glass.
Why Rear Glass Replacement Needs Care
Rear glass is usually tempered rather than laminated. Tempered glass is processed to improve its strength and tends to break into many small pieces when it fails. This behavior can make removal and cleanup difficult, especially when fragments enter the trunk, hatch, seat cushions, or body cavities.
Some rear windows also have narrow conductive lines embedded on or incorporated into the glass surface. These lines heat the window when the defroster operates. Scratching them, breaking a connector, or choosing incompatible glass can leave the defroster partly or completely inoperative.
Check the glass specification
Match the vehicle identification number, body style, model year, tint, dimensions, connector locations, and any integrated features against reliable parts information.
Inspect related components
Look for a damaged trim panel, corroded connector, worn gasket, bent frame, or rust around the window opening before fitting the replacement.
Gather the Correct Tools and Replacement Parts
Prepare every required part and tool before removing the old glass. Once a window opening is exposed, the vehicle is vulnerable to weather, and the replacement may need to be positioned within a specific adhesive working time. Having the correct supplies ready reduces unnecessary delays.
The exact tool list depends on the vehicle. A bonded rear window may require a specialized cutting system, glass-setting equipment, approved adhesive, and specific trim tools. A gasket-mounted window may require a suitable cord, gasket lubricant approved for the application, and help from another person.
Do not buy glass based on appearance alone. Two windows that look alike may have different curves, mounting features, connector positions, or tint specifications. Confirm compatibility through a reliable automotive glass supplier or the manufacturer’s parts information.
Source: i.ytimg.com
Compatible replacement glass
Choose glass designed for the exact vehicle configuration, including defroster elements, antenna connections, tint, and any special mounting features.
Protective equipment
Use safety glasses, suitable cut-resistant gloves, covered footwear, and clothing that protects exposed skin from glass fragments.
Glass removal equipment
A professional may use a specialized wire or powered cutting system and dedicated handling equipment. Select tools only after confirming the manufacturer’s removal procedure.
Automotive adhesive or gasket
Use the exact approved glazing adhesive, primer system, gasket, or seal specified for the vehicle. Check shelf life, storage conditions, and application instructions.
Cleaning and trim tools
Prepare approved surface cleaners, non-damaging trim tools, suitable waste containers, and materials for protecting the vehicle’s paint and interior.
Glass-setting equipment
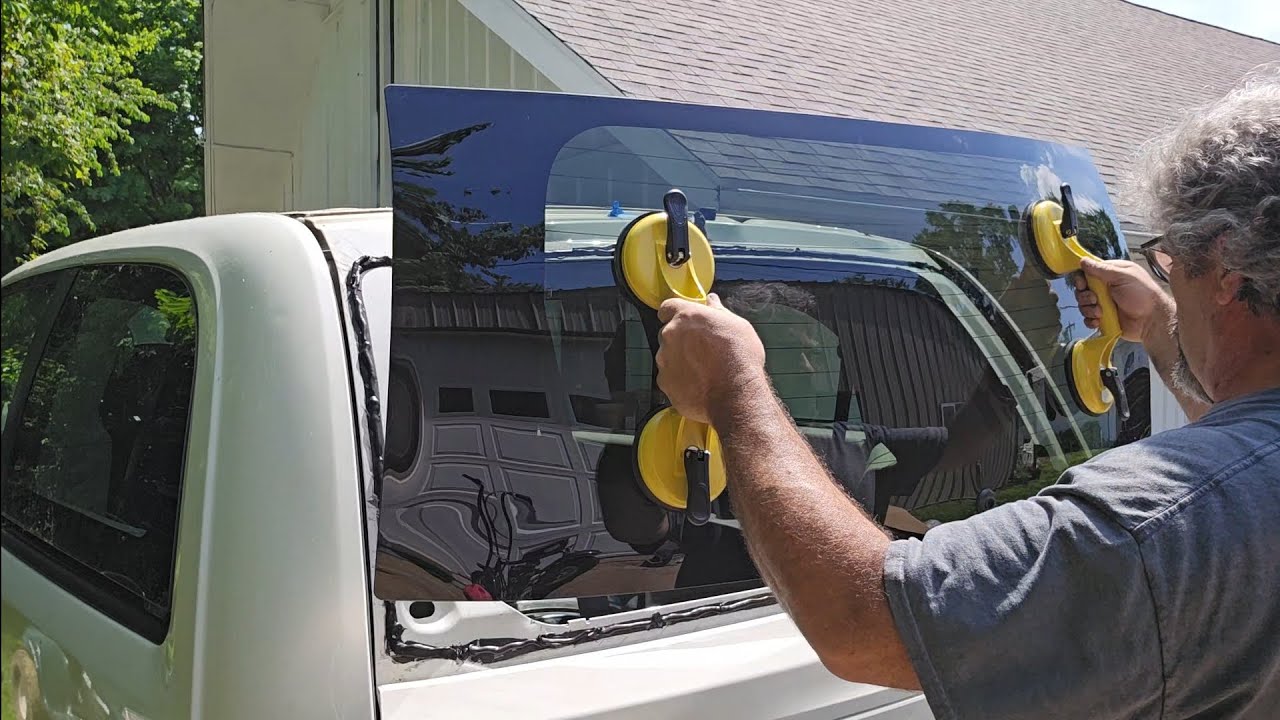
Professional suction handles and suitable positioning equipment help control a large, fragile panel during installation.
Can You Install Rear Windshield Glass at Home?
A mechanically skilled owner may be able to replace certain gasket-mounted windows or framed sliding windows if the vehicle instructions allow it and suitable assistance is available. Bonded rear glass is a more demanding repair because the glass must sit correctly in the opening and the adhesive must meet specified application and curing conditions.
A large glass panel can be difficult to support evenly without specialized equipment. A small positioning error may damage the glass, disturb the adhesive bead, or leave an uneven seal. If you cannot safely control the panel or confirm the correct bonding procedure, use a qualified auto glass installer.
Reasonable DIY scope
A straightforward, manufacturer-documented gasket or framed-window replacement may be manageable for a capable person with the correct parts, tools, and help.
Professional scope
Bonded glass, significant body corrosion, complex trim, damaged electrical connectors, and uncertain adhesive requirements are strong reasons to hire a trained technician.
Prepare the Vehicle Before Removing the Old Glass
Park the vehicle on a stable, level surface in a dry, well-ventilated work area. Keep children and pets away from the work zone, and prevent anyone from sitting in the vehicle while glass is being removed. If rain, wind, poor lighting, or extreme temperatures make the job difficult, postpone the work or use a professional facility.
Consult the vehicle service manual for the removal procedure and any battery-disconnection requirements. If the rear window includes electrical connections or nearby powered equipment, follow the specified isolation procedure before handling wiring. Do not disconnect a battery without considering manufacturer instructions for alarms, electronic settings, and other vehicle systems.
Remove the trim and interior panels that block access to the glass attachment points. Use the correct trim tools to reduce the chance of breaking clips or scratching the surrounding surfaces. Protect painted panels, upholstery, cargo trim, and nearby wiring before starting the glass removal process.
Source: hightech-autoglass.com
Confirm the replacement part
Inspect the new glass for shipping damage and verify its shape, mounting edges, tint, defroster connections, and part number before removing the existing window.
Protect the cabin
Cover seats, cargo areas, and exposed trim with suitable protective materials. Keep a clear area available for tools and broken-glass disposal.
Inspect the opening
Check for rust, paint damage, distorted metal, previous repair work, and evidence of earlier leaks. Significant corrosion or body damage should be corrected before new glass is fitted.
Review the service instructions
Identify trim removal points, electrical connectors, the approved glass attachment method, adhesive specifications, and the required safe drive-away conditions.
What If the Rear Windshield Is Already Shattered?
Treat shattered glass as a cut hazard, even when the pieces look small. Put on appropriate protective equipment, prevent people from entering the affected area, and avoid pressing on loose fragments. Do not pull large pieces away by hand or use an uncontrolled method that could send fragments into the cabin.
A professional can remove remaining glass, manage fragments around the body opening, and assess damage that may not be visible from outside. If the opening cannot be protected safely from rain or road debris, arrange prompt repair and avoid driving the vehicle.
Avoid bare-hand cleanup
Use suitable protective equipment and controlled cleanup methods. Fine fragments may remain in carpeting, trim, weatherstripping, and cargo compartments.
Do not ignore hidden damage
Check for damaged defroster connectors, bent trim, chipped paint, and corrosion before installing replacement glass.
Remove the Damaged Rear Windshield
The correct removal method depends on how the rear glass is attached. Bonded glass must be separated from the existing adhesive, while gasket-mounted glass and framed sliding windows follow different procedures. Use the service manual for the exact vehicle rather than applying one removal method to every car.
For bonded glass, a trained technician generally uses a suitable cutting system to separate the glass from the adhesive while limiting damage to the body opening. The process may require removing exterior moldings, interior trim, connectors, and other components that restrict access. Cutting in the wrong area can damage paint, wiring, trim, or the vehicle body.
Do not force a stuck window out with a screwdriver or other improvised lever. Excess pressure can bend the mounting flange or crack surrounding components. If the glass does not release as expected, stop and reassess the attachment points instead of applying more force.
Source: i.ytimg.com
Document the original fit
Where safe and practical, note the glass position, trim arrangement, connector locations, and visible adhesive condition before removal.
Disconnect electrical components correctly
Follow the vehicle instructions when removing defroster terminals or antenna connections. Avoid pulling on wires or bending the glass-mounted tabs.
Keep the opening protected
Prevent fragments from entering body cavities, and use controlled handling methods to avoid damage to nearby paint and interior materials.
Dispose of broken glass safely
Use a suitable rigid container or an approved glass-disposal method. Do not place loose sharp fragments in an ordinary bag that can tear during handling.
How to Remove a Gasket-Mounted Rear Window
A gasket-mounted window relies on a rubber seal that holds the glass against the body opening. Some designs use a locking strip or other retaining feature, so inspect the service instructions before attempting removal. Old rubber can become brittle and may split during the process.
If the gasket is damaged, hardened, or permanently deformed, replacing it may be necessary. Confirm the correct gasket profile and size before fitting the new glass. If the design requires specialized handling or the glass resists release, have an auto glass technician complete the removal.
Inspect the locking system
Determine whether the seal uses a locking strip, retaining clips, or another feature that must be released in a specific order.
Avoid body damage
Do not use excessive leverage against painted metal. Damaged paint around the opening can lead to corrosion and sealing problems.
Clean the Window Opening After Removal
Once the damaged glass is removed, inspect the entire mounting area for loose fragments, adhesive residue, rust, damaged paint, and bent metal. The new glass cannot seal correctly if the mounting surface is contaminated or the opening has been distorted.
For bonded glass, follow the adhesive manufacturer’s instructions on how much existing adhesive to retain, how to trim it, and whether a specific cleaner or primer is required. Do not assume that removing all old adhesive down to bare metal is always correct. Some approved systems require a particular preparation method, and exposed metal may need proper corrosion protection before installation.
If the opening shows significant rust, flaking paint, or previous collision damage, stop before applying adhesive. Have the damaged area assessed and repaired so the replacement window can be installed on a sound surface.
Remove contamination
Clear loose debris and clean the bonding or gasket surfaces using products approved for the specific installation system.
Preserve corrosion protection
Avoid scraping or cutting into the body flange unnecessarily. Repair damaged coatings according to the vehicle and adhesive manufacturer’s requirements.
Check the fit before bonding
Confirm the replacement glass aligns with the opening and its locating features before beginning the final installation.
Install a Bonded Rear Windshield Step by Step
A bonded rear windshield must be installed with the approved adhesive system and a controlled fitting process. The steps below explain the work sequence, but they are not a substitute for the exact vehicle service manual or adhesive technical data sheet. If either source requires a procedure you cannot carry out, have a professional complete the job.
Bonded glass may contribute to the vehicle body’s structural performance, depending on the design. The adhesive must form a continuous, correctly placed bond, and the glass must remain in the intended position while the adhesive cures. Incorrect materials, poor surface preparation, or premature driving can compromise the repair.
Source: carwindscreenrepairs.com.au
Step 1: Verify the glass and parts
Confirm the part number, glass orientation, defroster terminals, antenna features, and all required moldings or clips.
Step 2: Prepare the body flange
Clean and prepare the mounting surface as directed by the approved adhesive system. Address rust, damaged coatings, or distortion before continuing.
Step 3: Prepare the glass
Apply only the specified cleaner, primer, or preparation product, observing the required drying and handling conditions.
Step 4: Apply the approved adhesive
Use the specified automotive glazing adhesive and bead dimensions. Follow the product instructions for nozzle preparation, application temperature, open time, and bead placement.
Step 5: Position the glass
Use suitable glass-setting equipment and adequate assistance to lower the panel into the opening. Align the glass with the specified locating points without dragging it through the adhesive.
Step 6: Secure the assembly
Fit any required retaining supports, spacers, clips, or temporary tape according to the service instructions. Do not press or adjust the glass in a way that disrupts the bond.
Step 7: Reconnect and refit components
Reconnect the designated electrical terminals and reinstall trim or moldings only as instructed. Check that wires are routed correctly and are not pinched.
Step 8: Allow the adhesive to cure
Observe the adhesive manufacturer’s stated curing and safe drive-away requirements for the actual product, temperature, humidity, and installation conditions.
How to Apply Rear Windshield Adhesive Correctly
Automotive glazing adhesive is designed to bond glass to the vehicle’s prepared mounting surface. The required product may be a moisture-curing polyurethane or another manufacturer-approved system. Its performance depends on the specified surface preparation, bead geometry, application conditions, and cure requirements.
Use the exact product and preparation system approved for the vehicle. Do not substitute construction adhesive, household silicone, general-purpose sealant, or an unverified product simply because it appears to create a waterproof joint. A bead that prevents water from entering may still fail to provide the bond required by the vehicle design.
Do not guess the bead size or use a generic cure time. Read the technical data sheet for the adhesive and the vehicle service instructions. If the glass moves, the adhesive becomes contaminated, or the bead is interrupted, stop and follow the manufacturer’s correction procedure rather than trying to hide the defect with extra sealant.
Follow the approved bead design
Use the specified bead position and profile so the glass sits at the correct height and the adhesive forms the intended bond.
Check environmental limits
Temperature and humidity can affect application and curing. Work only within the product’s stated limits.
Do not rush the cure
A dry-looking surface does not prove that the adhesive has reached the required strength. Follow the stated safe drive-away time and restrictions.
How to Install a Gasket-Mounted Rear Windshield
A gasket-mounted window uses a different process from a bonded windshield. Inspect the new gasket for the correct profile, orientation, and condition, then follow the vehicle’s prescribed method for fitting the seal and glass. Some designs use a cord-assisted installation technique, but that method is appropriate only when the manufacturer specifies it.
The gasket must sit evenly around the opening without twists, gaps, or folded sections. Excessive force can chip the glass or damage the rubber. If the window will not seat evenly, stop and check the gasket size, glass orientation, body opening, and installation method.
Use the specified gasket
A gasket with the wrong dimensions or cross-section can prevent proper seating and lead to water leaks.
Check the full perimeter
Inspect the seal for even contact and correct engagement with the body opening before refitting the interior trim.
Reconnect the Rear Defroster and Other Electrical Features
Reconnect the rear defroster and any other glass-mounted electrical components only after the glass is correctly positioned and the work area is safe. Many vehicles use electrical tabs attached to the glass, while others include antenna connections or additional wiring. Use the wiring diagram or service manual to identify each connection.
Handle defroster terminals with care. The conductive heating lines are delicate, and a loose connector or damaged terminal can prevent the window from clearing in cold weather. Never pull a connector by its wire or force a terminal into a position that does not match its intended fit.
If the old glass was shattered, inspect the wiring and connectors for damage before reconnecting them. A replacement window with a different connector layout or electrical specification may not work correctly even if its outer dimensions match.
Source: advanceauto.co.th
Match the connectors
Confirm that the replacement glass has the correct terminals and features for the vehicle’s electrical system.
Secure the wiring
Restore the original routing and retainers so wires do not rub against sharp edges, become trapped under trim, or interfere with moving parts.
Test the defroster
After the installation and applicable curing requirements are complete, use the vehicle’s normal operating procedure to verify that the system works.
Investigate partial heating
If only part of the glass clears, check for damaged heating lines, connector problems, or a fault in the vehicle’s electrical system.
What If the Rear Defroster Does Not Work?
Start with the owner’s manual and confirm that the defroster is being operated correctly. Then inspect accessible connectors, fuses, and wiring using the vehicle’s service information. Do not assume the replacement glass itself is defective until the electrical supply and connections have been checked.
A damaged heating line may require a compatible repair product, while a broken terminal or internal glass defect may require a different repair. Use products specifically intended for the affected component, and avoid applying an improvised electrical repair that could damage the glass or create a short circuit.
No heating anywhere
Check the specified fuse, switch operation, supply circuit, ground connection, and related control components using the correct diagnostic procedure.
Only some lines fail
Inspect the heating elements for visible damage and have the affected lines tested with an appropriate method.
Inspect the Installation for Leaks and Fit Problems
After the glass is installed, inspect its position, trim, connectors, and visible seal. The panel should align with the body as specified, with no obvious gaps, uneven edges, loose moldings, or pinched wiring. Do not press hard on the glass to test the bond.
Water testing should follow the vehicle or adhesive manufacturer’s instructions and take place only when the installation is ready for that test. Avoid high-pressure washing or directing a strong stream at the edge of fresh glass. Excessive pressure may disturb an uncured seal or force water past an area that would not leak under normal conditions.
If you find a leak, do not assume that smearing sealant over the visible edge will solve it. Water can travel along trim, body seams, or wiring passages before appearing inside the cabin. Identify the source and follow the approved repair method, which may require removing and reinstalling the glass.
Source: i.ytimg.com
Check glass alignment
Compare the position of the glass and trim with the vehicle’s original fit and the service specifications.
Inspect the interior
Look for moisture around the rear shelf, cargo area, headliner edges, trim panels, and nearby electrical components.
Check for unusual noises
Loose trim, incorrectly fitted moldings, or poor glass positioning can cause rattles or wind noise. Have the source identified rather than applying extra force to the glass.
Verify electrical operation
Check the rear defroster and other fitted features once it is safe to operate them and all installation requirements have been met.
How to Recognize a Failed Rear Windshield Installation
Common warning signs include water entering the cabin, visible gaps, loose trim, persistent wind noise, glass movement, or a defroster that fails after replacement. These symptoms may point to a sealing issue, incorrect alignment, damaged wiring, unsuitable parts, or an adhesive problem.
If the glass shifts, the bond appears separated, or water reaches electrical components, stop using the vehicle until it has been assessed. Do not try to correct a structural bonding problem with additional sealant applied over the outside edge.
Water leaks
Have the complete perimeter and nearby body seams checked to locate the actual entry point.
Loose or uneven glass
Arrange a professional inspection before driving. Incorrect bonding or support can compromise the installation.
Electrical faults
Check the connectors and circuits with the correct diagnostic information. Avoid operating damaged wiring.
How Long Does Rear Windshield Installation Take?
The time required depends on the vehicle, attachment method, extent of damage, availability of parts, and condition of the mounting area. A straightforward replacement may take less time than a repair that requires removing extensive trim, cleaning shattered glass from the cabin, or correcting corrosion around the opening.
Installation time and safe drive-away time are different. A technician may finish placing the glass well before the adhesive has reached the strength required for the vehicle to be driven. The approved safe drive-away time depends on the exact adhesive system and its application conditions.
Do not rely on a universal number of minutes or hours. Ask the installer which adhesive is being used, what conditions affect curing, and when the vehicle may safely return to the road. Follow any additional restrictions stated in the vehicle service instructions.
Source: i.ytimg.com
Simple gasket replacement
Timing depends on seal condition, access, and whether the existing gasket can be reused or needs replacement.
Bonded glass replacement
Time depends on trim removal, glass handling, surface preparation, adhesive application, and the required curing period.
Additional body repairs
Rust, distorted metal, or damaged paint can add work before the new glass can be safely installed.
When Is It Safe to Drive After Installation?
Drive only after the installation meets the specified safe drive-away requirements. The adhesive product instructions and vehicle requirements determine when the glass bond is suitable for use, so a generic waiting period is not reliable for every vehicle.
Ask the installer to confirm the approved release time and any restrictions. If the glass was installed using an unknown adhesive or the curing conditions were outside the product’s limits, do not assume the bond is safe simply because the glass feels firm.
Confirm the adhesive
Obtain the product name and its applicable technical instructions when clarification is needed.
Respect curing conditions
Temperature, humidity, product type, and other specified conditions may affect the required waiting period.
Rear Windshield Replacement Cost in the United States
Rear windshield replacement cost in the United States varies by vehicle, glass specification, labor rates, and the complexity of the installation. A common replacement may cost less than a job involving specialty glass, extensive trim removal, hard-to-find parts, or repairs to the window opening.
Rear glass often needs complete replacement after shattering because tempered glass breaks into many small pieces. The price may also include cleanup, new moldings, a replacement gasket, electrical connector repairs, disposal, and mobile service when offered.
Rather than relying on a single national price, request an itemized estimate for your exact vehicle. Confirm whether the quote includes the correct glass, required seals and adhesive, installation labor, taxes, disposal, and any additional repairs.
Source: i.ytimg.com
Vehicle and glass type
The model, year, body style, tint, defroster, antenna features, and parts availability affect the replacement price.
Labor and access
Complex trim, difficult access, broken-glass cleanup, and a damaged window opening may increase labor costs.
Additional materials
The quote may include adhesive, a gasket, moldings, clips, or other parts required for a correct installation.
Insurance coverage
Review your policy’s comprehensive coverage, deductible, and glass-specific terms. Coverage and claim rules vary by policy and state.
How to Compare Auto Glass Quotes
Ask at least two providers for quotes based on the same vehicle details and glass features. Confirm that each quote covers the complete installation rather than only the price of the glass panel.
Ask whether the provider will correct rust or body damage before installation, which adhesive system will be used, and how the safe drive-away time will be determined. A lower quote may not include the same parts or work, so compare the written scope instead of the total alone.
Request an itemized quote
Separate the glass, labor, materials, trim, cleanup, taxes, and additional repair costs where applicable.
Confirm warranty coverage
Ask what the warranty covers for workmanship, water leaks, trim problems, and glass defects, including any exclusions.
Verify insurance arrangements
Contact your insurer before authorizing work if you intend to file a claim, and confirm whether a preferred repair network applies.
Common Rear Windshield Installation Mistakes to Avoid
Most installation problems begin before the new glass is placed. Incorrect parts, damaged mounting surfaces, poor preparation, and unsuitable sealants can lead to leaks, electrical faults, or a weak bond. Following the exact vehicle and adhesive instructions is more reliable than copying a procedure from a different model.
The most serious mistake is driving before a bonded installation meets its specified safe drive-away requirements. Other avoidable errors include forcing the glass into position, reusing a damaged gasket, scratching defroster lines, and covering a failed bond with extra sealant.
Stop work if the opening is corroded, the replacement does not fit, the adhesive has been contaminated, or the glass cannot be held securely. Correcting the underlying problem before proceeding is safer than trying to finish the installation at any cost.
Source: hightech-autoglass.com
Using the wrong glass
Incorrect curvature, connector placement, tint, or mounting features can prevent proper installation or leave electrical systems inoperative.
Using household sealant
Ordinary silicone and construction products are not substitutes for an approved automotive glazing system.
Ignoring rust or paint damage
Corrosion and damaged coatings can affect the mounting surface and require repair before glass installation.
Forcing the panel into place
Excessive pressure can crack the glass, distort the opening, or disrupt the adhesive bead.
Skipping electrical checks
A window may look correct while the rear defroster or antenna remains disconnected or damaged.
Driving too early
The adhesive may not have reached the required strength even when the glass appears secure.
When Should You Stop and Call a Professional?
Stop if you find substantial corrosion, damaged body metal, broken electrical terminals, or glass that does not match the opening. These conditions require more than a simple panel swap. A qualified technician can identify the correct parts, repair the mounting area, and use a suitable installation system.
Professional help is also the prudent choice if you lack safe glass-handling equipment, cannot support the replacement panel securely, or do not have the applicable service instructions. The cost of a proper installation is often easier to manage than correcting leaks, damaged trim, or an improperly bonded window later.
Structural concerns
Have damaged mounting flanges, significant rust, or signs of collision damage inspected before installing the replacement.
Uncertain bonding procedure
Do not improvise adhesive selection, surface preparation, bead dimensions, or cure times.
Persistent leaks or movement
Have the installation assessed and corrected before returning the vehicle to normal use.
A Practical Final Inspection Checklist
Before accepting a rear windshield replacement, review the finished work against the vehicle requirements. A clean appearance is useful, but it does not prove that the adhesive bond or seal is correct. Check visible details and ask the installer to confirm any procedure that cannot be verified by inspection alone.
Keep the receipt, glass part information, adhesive or installation documentation when available, and warranty details. These records help if a leak, defroster fault, or other installation issue appears later.
Source: i.ytimg.com
Glass fit
The glass is aligned as specified, without obvious gaps, chips caused during fitting, or loose edges.
Trim and seals
Moldings, clips, gaskets, and interior panels are seated correctly and do not rattle.
Electrical function
The rear defroster and other fitted electrical features work as intended.
Interior condition
There is no visible loose glass, trapped wiring, or new damage to upholstery and trim.
Water sealing
The installation passes the approved leak inspection when the glass and seal are ready for testing.
Driving clearance
The installer has confirmed that all required curing and safe drive-away conditions have been met.
What to Do If a Problem Appears Later
Contact the installer promptly if you notice water entering the cabin, new wind noise, loose trim, glass movement, or a defroster fault. Explain when the symptom first appeared and whether it occurs in specific weather or operating conditions.
Avoid removing trim, applying extra sealant, or disturbing the glass before the provider has inspected the problem. An unauthorized repair may complicate diagnosis or affect warranty coverage. If the glass moves or its bond appears to be failing, do not drive until a qualified technician has assessed the vehicle.
Document the symptom
Record where water appears, which electrical feature fails, or which trim area produces noise, without disturbing the installation.
Use the warranty process
Contact the repair provider and follow the documented procedure for inspection and corrective work.
Frequently Asked Questions
Q
Can I install a rear windshield myself?
Some gasket-mounted windows and framed pickup windows may be suitable for a capable DIY installer who has the correct parts, tools, and vehicle instructions. Bonded rear glass is more demanding because it requires the right adhesive, surface preparation, glass positioning, and curing conditions.
If the vehicle has complex trim, significant rust, damaged electrical connections, or an uncertain bonding procedure, hire a qualified auto glass technician. Do not attempt a job that you cannot complete with safe glass-handling equipment.
Q
What adhesive should I use for a rear windshield?
Use the automotive glazing adhesive specified for the vehicle and installation system. Many bonded windows use a compatible polyurethane adhesive, but the exact product and preparation process vary by application.
Follow the vehicle service instructions and the adhesive manufacturer’s technical data sheet. Household silicone, construction adhesive, and general-purpose sealants should not be used as substitutes for a required automotive glass bond.
Q
How long after rear windshield installation can I drive?
The safe drive-away time depends on the approved adhesive system and its actual application conditions. Temperature, humidity, product type, and vehicle requirements can affect the time needed to reach the required bond strength.
Ask the installer to confirm the specific release time. Do not drive merely because the glass appears firmly seated or the adhesive feels dry on the surface.
Q
Can a rear windshield be repaired instead of replaced?
A shattered tempered rear window generally needs replacement rather than the type of small chip repair sometimes used for laminated windshield glass. The tempered panel usually breaks into many small fragments, making restoration impractical.
If the damage is limited to a defroster line or electrical terminal and the glass itself is intact, a suitable electrical repair may be possible. Have the damaged component identified before deciding whether the entire window needs replacement.
Q
How can I stop a rear windshield from leaking after installation?
First, identify the source of the leak. Water may enter through an incorrectly seated gasket, a damaged bonded seal, a nearby body seam, or a wiring passage rather than the point where moisture becomes visible inside the cabin.
Have the complete area inspected and repaired using the approved method. Applying extra sealant over the visible edge may conceal the symptom without fixing the underlying problem, especially when the adhesive bond is defective.
Q
Does insurance cover rear windshield replacement in the United States?
Coverage depends on the policy, the cause of the damage, the deductible, and any state-specific provisions. Comprehensive coverage may cover certain glass damage, but the details vary among policies and insurers.
Contact your insurance company before authorizing a replacement if you plan to file a claim. Ask whether a deductible applies, whether a preferred repair network is required, and whether the policy covers original-equipment or other compatible replacement glass.
✦ Wrapping Up
Conclusion
Learning how to install rear windshield glass begins with identifying the correct window type and following the vehicle’s approved repair procedure. Safe removal, careful surface preparation, compatible glass and seals, correct electrical connections, and a proper final inspection all matter.
Bonded rear glass deserves particular care because the adhesive must meet specific application and curing requirements. A panel that looks secure may still have a defective bond, so appearance alone cannot confirm that an installation is safe.
For many modern cars and SUVs, professional replacement is the most practical way to manage broken glass, preserve the mounting surface, and verify the finished installation. If you choose a DIY repair for a suitable gasket-mounted or framed window, use the exact service instructions and stop if any part of the process becomes uncertain.
💡 Key Takeaway
Before beginning, identify your vehicle’s exact rear glass specification, obtain the correct service instructions, and confirm the required installation materials. If the window is bonded or the procedure cannot be verified, arrange professional auto glass replacement and obtain confirmation of the safe drive-away time.
Learn how to put windshield washer fluid in a Smart car, locate the reservoir, choose the right fluid, refill it safely, and troubleshoot common problems.