TIG Torch Parts: Collets, Cups, Gas Lenses, and Care
A TIG torch holds the tungsten electrode and directs shielding gas around the weld; its collet, cup, and other parts must match the torch and each other. The right setup gives you stable gas coverage and a predictable arc, while worn or mismatched pieces can cause leaks, contamination, and frustrating weld defects.
Have you ever changed a cup to reach a tight corner, then watched the weld turn gray or peppered with pinholes? Or wondered whether a gas lens is worth fitting when the standard parts seem to work?
I once swapped torch parts in a hurry before a repair and missed a small gap where the cup met the torch body. The arc sounded fine, but the weld surface came out rough enough to make me stop and recheck the whole setup. It’s a common mistake, not a dumb one.
I wrote this for anyone choosing replacement consumables, sorting out a confusing torch kit, or trying to fix shielding problems without buying parts at random. You’ll get a plain-English map of the parts and a sensible way to check fit.
When you match the parts and keep them clean, you can spend less time chasing porosity, avoid wasting tungsten, and feel more confident setting up for your next weld. Skip the checks, and even a good machine can give you a messy result.
This takes about 9 minutes to read. By the end, you’ll know how to:
- Identify the main parts and what each one does.
- Match cups, collets, and gas lenses to your torch.
- Assemble and inspect the torch without damaging small parts.
- Spot common shielding and fit problems before they ruin a weld.
TIG Torch Parts: What Each Piece Does
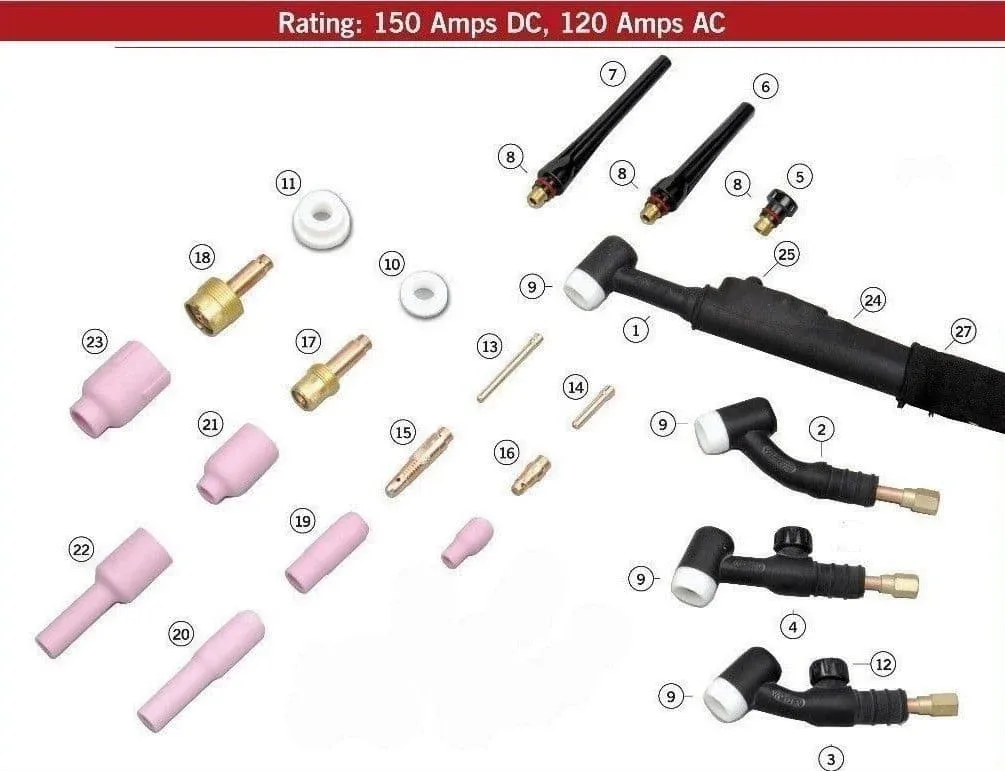
TIG torch parts work as a stack: the torch body holds the electrode, the collet grips it, and the cup or gas lens delivers shielding gas to the weld. A typical setup includes a torch head, collet body or gas lens, collet, tungsten, cup, and back cap.
The torch head is the front end that supports the parts and carries current and shielding gas toward the weld. Air-cooled and water-cooled torches also differ in how they shed heat, so parts that fit one torch family may not fit another.
The collet is a slotted metal sleeve that grips the tungsten when you tighten the back cap. The collet body seats inside the torch head and routes gas to the cup; a gas lens does the same job with a screen that spreads gas more evenly.
The cup is the ceramic or glass outlet surrounding the tungsten. Cup size affects gas coverage and access, but a larger cup doesn’t automatically make a better weld if the gas flow and joint shape aren’t suited to it.
| Part | Main job | What to check |
|---|---|---|
| Torch head | Holds front-end parts and carries current and gas | Torch type, size, and cooling style |
| Collet | Grips the tungsten | Diameter matches the tungsten |
| Collet body | Seats the collet and sends gas toward the cup | Correct fit for torch head and cup |
| Gas lens | Spreads shielding gas through a screen | Lens and cup fit the torch system |
| Cup | Directs gas around the tungsten and weld | Thread or seating style, size, and condition |
| Back cap | Tightens the collet and closes the rear of the torch | Length and fit for torch setup |
A back cap screws into the rear of the torch head and applies pressure through the collet. Short caps can help in tight spaces, but don’t force one that won’t seat cleanly.
Other details matter, too. The insulating parts keep the energized torch components separated from the operator and nearby metal, while the torch cable carries current and shielding gas, and may also carry cooling water on a water-cooled torch.
If you’re sorting out how a TIG torch fits into the larger family of welding tools, welding guns, torches, and holders have different jobs even when the names sound similar. A TIG torch uses a nonconsumable tungsten electrode, unlike a MIG gun’s wire-feed setup or a stick electrode holder.
How to Match TIG Torch Parts
Matching TIG torch parts means checking the torch model or series, tungsten diameter, and cup or gas-lens compatibility before you buy. A part that looks close can still have the wrong threads, seating shape, or bore.
Start with the torch’s model number or the parts chart that came with it. Torch series are often identified by numbers such as 9, 17, 18, or 26, but don’t assume every brand uses interchangeable parts just because the number matches.
Then match the collet to the tungsten diameter. A loose collet won’t hold the electrode firmly, and an oversized tungsten can’t seat properly in a smaller collet. Common tungsten diameters include 1/16 inch, 3/32 inch, and 1/8 inch.
Cup numbers often relate to approximate cup diameter in sixteenths of an inch, but naming conventions and actual dimensions can vary by manufacturer. Use the product dimensions or torch parts chart, rather than relying on a number alone.
| Setup choice | What it changes | Best fit when |
|---|---|---|
| Standard collet body and cup | A straightforward gas path and compact setup | General welding with good access |
| Gas lens and compatible cup | More even gas flow and a wider, less obstructed gas outlet | The joint needs broader coverage or improved access |
| Small cup | Easier access to tight corners | The weld area is small and gas coverage remains adequate |
| Large cup | Wider gas coverage, with a larger outer profile | The joint allows room for the cup and gas flow suits the setup |
A gas lens has a fine screen that helps distribute gas more evenly as it exits the torch. It can help with longer tungsten stickout or awkward joints, but it won’t fix a leak, a dirty workpiece, or poor gas settings.
Are you trying to reach a narrow corner with a small cup? Check whether the tungsten sticks out farther than the gas coverage can protect; changing to a gas lens and a compatible cup may help, but the cup still needs clear access to the joint.
Gas flow depends on the cup, gas lens, shielding gas, draft, and welding position. Use the machine or torch maker’s guidance as your starting point, then adjust only after checking for leaks and drafts. More flow isn’t always better: excessive flow can become turbulent and pull air into the shielding zone.
Pro Tip: If the part chart is missing, compare the torch model and the measurements of the part you’re replacing. A photo can help identify the shape, but it can’t confirm thread size or internal fit.
TIG, MIG, and stick equipment share some broad labels, but their consumables aren’t interchangeable. MIG welding gun parts guide wire from the feeder through a liner and contact tip, while TIG torch parts manage tungsten and shielding gas; stick electrode holder parts grip a flux-coated electrode instead.
How to Assemble, Care for, and Troubleshoot a Torch
A clean, correctly assembled TIG torch gives shielding gas a clear path and holds tungsten firmly. Shut off the power, let hot parts cool, and follow the machine manual before handling the torch; disconnect or isolate equipment as directed by its maker.
- Check that the torch, cup, collet body or gas lens, collet, and back cap belong to the same compatible system.
- Inspect each piece for cracks, damaged threads, stuck metal, or a clogged gas screen.
- Slide the correct collet into the collet body or gas lens, then seat the assembly in the torch head.
- Fit the cup and insert clean tungsten through the torch.
- Tighten the back cap until the tungsten is held securely. Don’t crank it down with tools unless the torch maker calls for that.
- Check that the cup sits squarely, the tungsten doesn’t wobble, and the gas path is open before you weld.
I once kept a cup in service because its hairline crack was hard to spot under shop lighting. After I replaced it, the stubborn shielding issue went away, and I learned to inspect ceramic parts from several angles instead of trusting a quick glance.
The tungsten should be clean and held straight, with enough stickout for the joint but not so much that gas coverage suffers. Don’t touch the prepared tip with dirty gloves or lay it on a steel bench; a tiny bit of oil or grit can become a much bigger problem at the arc.
Find the cause before changing gas flow
Porosity, oxidation, or an unstable arc can come from several places, so change one thing at a time. The table below helps narrow the search without treating every bad weld as a gas-flow problem.
| Symptom | Possible cause | First check |
|---|---|---|
| Porosity or pinholes | Leak, draft, dirty base metal, or poor gas coverage | Inspect fittings and torch parts, then check cleanliness and airflow |
| Gray or sooty weld surface | Shielding interruption, excess stickout, or contaminated tungsten | Check cup condition, tungsten, and gas coverage |
| Tungsten shifts during welding | Wrong collet size or loose back cap | Match the collet to the tungsten and tighten by hand |
| Cup won’t seat squarely | Mismatched parts, debris, or damaged threads | Clean the mating surfaces and confirm torch compatibility |
| Gas flow seems weak | Blocked screen, kinked hose, or regulator issue | Check the gas path and hose before changing settings |
Weld appearance can point you in the right direction, but it doesn’t identify one cause with certainty. A draft near an open door can disturb gas just as surely as a damaged cup, so check the work area as well as the torch.
Important Tip: Before removing or replacing parts, let the torch cool and keep the electrode away from energized metal. If you find damaged insulation, exposed conductors, leaking cooling water, or a torch that overheats, stop welding and follow the equipment maker’s service guidance.
For routine care, wipe the outside of the torch and cup, keep parts in a clean container, and replace cracked ceramic cups or badly worn components. Don’t scrape a delicate gas-lens screen with a sharp tool; replace a clogged or damaged lens rather than pushing debris deeper.
- Match each part to the torch model and tungsten diameter, not just its appearance.
- Check for cracks, debris, loose fittings, and drafts before raising gas flow.
- Replace damaged insulation or leaking components before returning the torch to service.
FAQs About TIG Torch Parts
Are TIG torch parts universal?
No, TIG torch parts aren’t universal. Torch series, brand, cooling style, cup fit, and thread design can all affect compatibility. Check the torch’s parts chart or model information before ordering, especially for gas lenses and back caps, where similar-looking parts may seat differently.
What does a gas lens do on a TIG torch?
A gas lens spreads shielding gas more evenly as it leaves the torch, using a screen inside the lens assembly. The smoother flow can help with broader coverage or longer tungsten stickout, but it won’t correct a leak, a dirty joint, or drafts around the work.
How often should I replace TIG torch parts?
Replace TIG torch parts when inspection shows damage, wear, blockage, or a poor fit, rather than on a fixed schedule. Ceramic cups need replacement if cracked, and a collet or gas-lens screen needs attention if it no longer holds cleanly or passes gas as intended.
Can I use a larger cup to stop TIG weld porosity?
Sometimes a larger cup can improve gas coverage, but it won’t solve every cause of porosity. Check for drafts, gas leaks, dirty metal, contaminated tungsten, and excessive stickout first. The right cup depends on the joint, available access, and compatible torch setup.
Why does my TIG torch cup keep coming loose?
A TIG torch cup may come loose if the threads or seating surfaces are dirty, damaged, or mismatched. Let the torch cool, remove the cup, and inspect both parts. Don’t force threads or use pliers on a ceramic cup; replace damaged parts and confirm compatibility.
Make Your Next Torch Setup Simple
The best TIG torch setup is the one that fits your torch, holds the tungsten securely, and gives the weld steady gas coverage. I’d start with the manufacturer’s parts chart, then replace only the pieces that are damaged, dirty beyond cleaning, or clearly mismatched.
A small check before welding can save a lot of grinding and head-scratching later. Confirm the collet size, inspect the cup and gas path, and make sure the tungsten is clean and secure. If the weld still looks wrong, check for drafts and leaks before reaching for a different cup or turning up the gas.
That’s a calmer way to troubleshoot, and it keeps a simple consumable problem from eating up your afternoon.