How to Choose Welding Cable Size and Length
Choose welding cable by matching its gauge to your welder’s output, duty cycle, and the full length of the current path. Longer or higher-current leads need larger cable to limit voltage drop and excess heat.
Are you adding a longer lead and wondering why the arc feels different? Or trying to pick a cable size without buying something so bulky it’s a pain to handle?
I once added an extension to a welding lead to reach a work area, then spent the afternoon chasing an arc that felt weaker than usual. The cable run was the part I’d overlooked, and I had to redo the setup before I could get back to work. It’s a common mistake, not a dumb one.
I wrote this guide to make cable sizing easier to work through, especially if you’re setting up a home shop or changing the reach of an existing welder. You’ll learn which machine details matter, how to count the full cable run, and when to check the manufacturer’s chart instead of guessing.
Get the size and length right, and you can reach your work without inviting unnecessary voltage drop, hot cables, or a frustratingly unstable arc. This takes about 8 minutes to read, and you’ll come away knowing how to:
- Match cable size to current and duty cycle.
- Count the complete welding circuit, not just one lead.
- Spot undersized, damaged, or poorly connected cable.
- Choose connectors and work clamps that fit the cable.
Welding Cable Size and Length: How to Choose
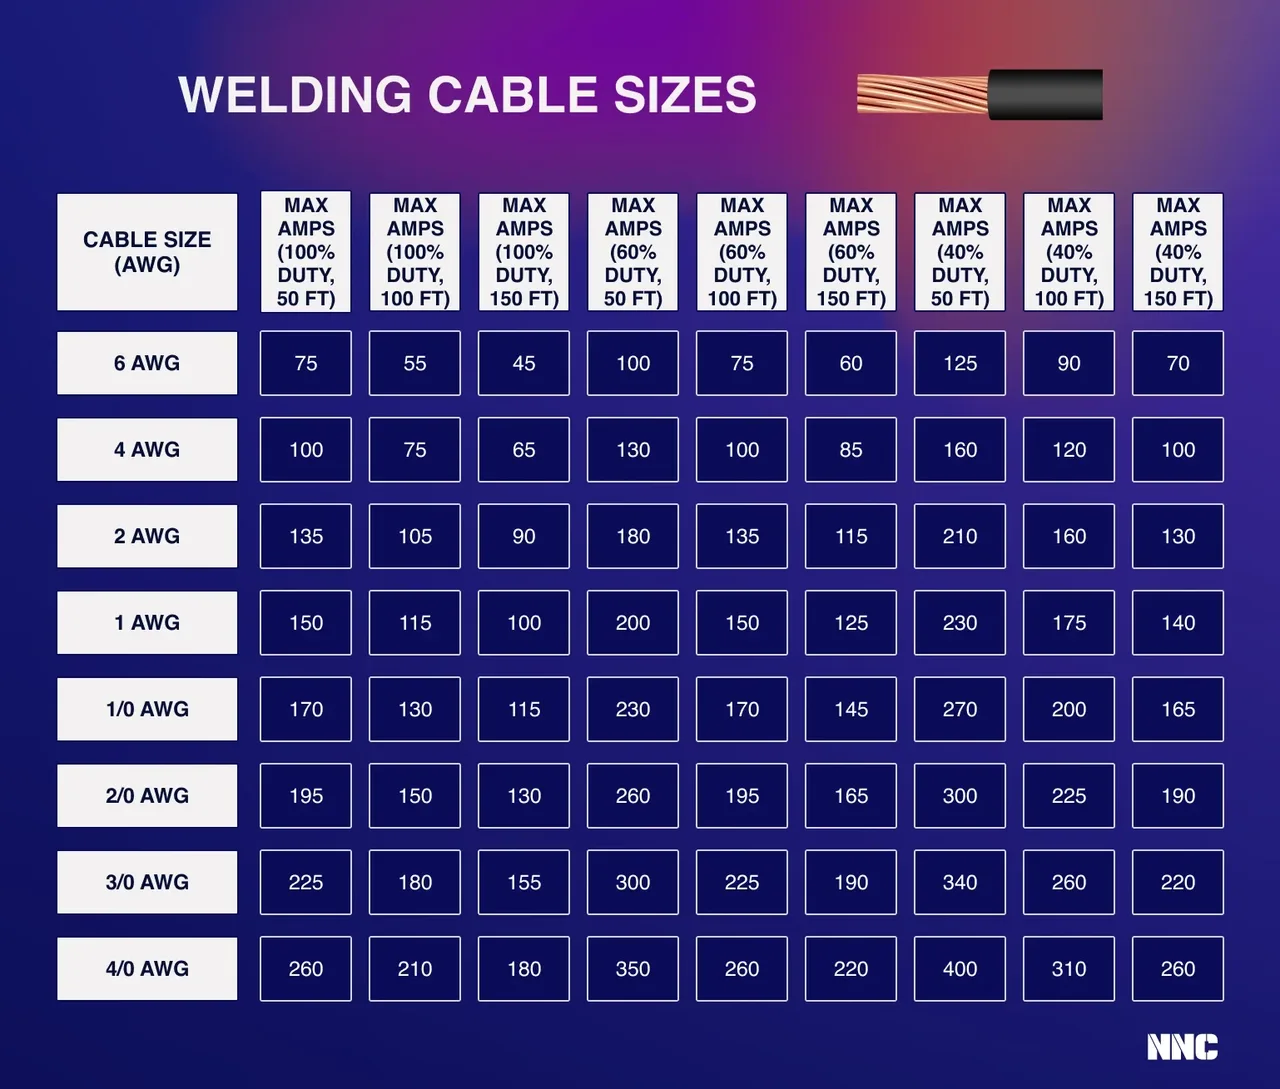
The right welding cable size depends on amperage, duty cycle, and the total length of the electrode and work leads. Start with your machine’s manual or cable-sizing chart, then confirm that the chart’s length measurement matches your setup.
- Check the welder’s output. Use the current you expect to weld at, not just the maximum number printed on the machine. If you usually weld at 180 amps but occasionally turn up to 250 amps, check that your cable can handle the higher setting for the duty cycle you’ll use.
- Check the duty cycle. Duty cycle tells you how long a welder can run at a given output within a 10-minute period before it needs to cool. Cable ratings and sizing charts may account for duty cycle, so use the machine or cable maker’s guidance rather than applying your own adjustment.
- Measure both leads. Add the electrode lead and the work lead. A 25-foot electrode lead and a 25-foot work lead make a 50-foot total cable path.
- Match that information to a sizing chart. Choose a cable gauge rated for the current, duty cycle, and full path length. If the chart doesn’t explain how it defines length, confirm the method before buying.
- Check the connectors and clamp. The cable, connectors, and clamp all need to suit the current and fit together securely. A thicker cable won’t fix a loose or poorly matched connection.
American Wire Gauge (AWG) is the sizing system used for many welding cables. The lower the AWG number, the thicker the cable: 1/0, pronounced “one-aught,” is thicker than 1 AWG, and 2/0 is thicker than 1/0.
A cable-sizing chart is more useful than a guess because cable temperature and performance depend on the whole setup. Cable construction, insulation, ambient heat, duty cycle, and how the cable is routed can all affect the rating. Treat general size ranges as a starting point, and follow the cable or welder manufacturer’s chart for your exact conditions.
| What you know | What to check | Why it matters |
|---|---|---|
| Welding current | Expected working output, plus any higher setting you’ll use | Higher current creates more heat in the cable |
| Duty cycle | Machine rating at the current you plan to run | Longer welding periods put more heat into the cable |
| Cable length | Combined length of electrode and work leads | A longer current path increases resistance and voltage drop |
| Cable gauge | Manufacturer’s chart for the full setup | Larger conductors can reduce voltage drop, but the rating still matters |
| Cable condition | Jacket, strands, and connection points | Damage or looseness can create a hot spot |
The sizing terms can be confusing because some tables show one-way distance while others show the combined length of both leads. If a chart uses one-way distance, a 25-foot lead from machine to work is the distance it’s asking for; if it uses total circuit length, include the return lead as well.
Pro Tip: Label the length convention right on your notes. “25 feet to the work” and “50 feet total leads” describe the same setup, but they don’t mean the same thing in every sizing chart.
When you compare welding cables and connectors, check that the cable gauge, connector rating, and connection style work together. Cable can be the right size on paper and still underperform if the connection is loose or the connector doesn’t fit the cable properly.
How Cable Length Affects Voltage Drop
Longer welding cables can cause voltage drop, the loss of voltage as current travels through the cable. A longer path, smaller cable, or higher welding current can increase the drop, which may make the arc feel less steady.
The current travels from the welder through the electrode lead, across the arc and workpiece, then back to the welder through the work lead. That’s why the full circuit matters. Measuring only the electrode lead leaves out half the cable path.
Cable material and size matter, too. Copper welding cable has many fine strands, so it bends more easily than stiff wire with the same conductor size. A thicker conductor generally has less electrical resistance, but it’s heavier and less flexible, so the goal is to choose a size that matches the job rather than simply buying the biggest cable available.
I once focused on the distance from the machine to the work and forgot to account for the return lead in my notes. When I checked the whole path, the cable plan made more sense and I stopped treating the extra reach as a small detail. The lesson was simple: count the circuit before choosing the cable.
How can you tell if cable length might be part of an arc problem? A longer-than-usual setup paired with a weak-feeling arc is a reason to check the run, connections, and cable condition, though it isn’t proof that cable is the cause. Wire feed settings, electrode choice, workpiece condition, and machine settings can affect arc behavior too.
For a rough voltage-drop check, electrical resistance calculations use both current and conductor length. A shop-floor calculation can be a useful comparison between two cable setups, but it isn’t a substitute for a manufacturer’s welding cable chart, which accounts for the cable’s construction and rating.
- Compare cable runs using the same welding current and cable type.
- Treat a longer run as a reason to check the chart for a larger gauge.
- Recheck connectors and the work clamp before blaming the cable alone.
Don’t confuse voltage drop with a machine fault. If the cable is sized correctly and the connections are clean and tight, a poor arc may come from the work setup or welder settings instead. Change one thing at a time, so you can tell what fixed the problem.
Connectors, Work Clamps, and Cable Safety
Welding cable needs secure, correctly sized connections at both ends. A mismatched connector or poor clamp contact can create resistance and heat even when the cable itself is the right gauge.
Many welding leads use Dinse connectors, which plug into matching machine or lead receptacles. Other setups use different connector styles, including cam-lock connections. Check the welder’s receptacle and the connector’s fit instead of assuming that similar-looking parts will mate correctly.
Cable size matters at the connection point. A connector that accepts a smaller conductor may not hold a larger cable securely, and loose strands can prevent a sound fit. Follow the connector maker’s instructions for assembly, and don’t force cable into a connector that wasn’t made for it.
For a better match, compare welding cable connectors by cable size, connection style, and rated current. A firm fit is the goal; a connection that slips, feels loose, or gets unusually hot needs attention before you keep welding.
The work clamp needs clean contact with the workpiece or a solid conductive part of the work setup. Paint, rust, scale, and grease can interfere with that contact. Place the clamp where it can stay secure and provide a short, direct return path, not on a thin, loose, or coated piece of metal.
Choosing suitable welding work clamps also means checking the clamp’s condition and how well its jaws grip. A clamp that barely bites can be more trouble than a slightly awkward cable run, since poor contact can contribute to heat and an erratic arc.
Important Tip: Switch off the welder before disconnecting or changing leads. Don’t handle exposed conductors or worn connectors while welding, and follow the machine maker’s instructions for connections.
Before each job, look for cuts, crushed sections, exposed strands, and darkened or softened insulation. A warm cable may be a sign to stop and investigate, especially if one section or connector is much hotter than the rest. Don’t keep welding through a damaged jacket or a connection that’s getting hot.
Use this quick check if the cable setup isn’t behaving:
| What you notice | What to inspect first |
|---|---|
| Arc seems weak with a longer setup | Cable size, total lead length, and connections |
| Connector feels loose | Connector-to-cable fit and assembly |
| One spot gets hot | Cable damage, loose strands, or poor contact |
| Clamp slips or sparks at the work | Jaw grip and the contact area |
| Cable is hard to move | Routing, cable condition, and whether the setup is longer than needed |
Never fix a cable problem by wrapping damage and carrying on. If the conductor is exposed, the insulation is damaged, or a connection won’t stay secure, stop using that section and replace or repair it using parts and methods suited to the cable. If you’re unsure how to make a safe repair, ask a qualified welding-equipment technician.
- Size cable by current, duty cycle, and the chart’s definition of length.
- Count both electrode and work leads when the chart calls for total circuit length.
- Check cable condition, connector fit, and clamp contact if the arc or lead temperature seems wrong.
FAQs About Welding Cable Size and Length
What size welding cable do I need for a 200-amp welder?
The right cable size for a 200-amp welder depends on the cable length, duty cycle, and the cable’s rating. Check the welder or cable maker’s sizing chart for your full setup; a short lead and a long combined lead run may call for different gauges.
Do I add the electrode and work lead lengths together?
Yes, when the sizing chart asks for total circuit length, add the electrode lead and work lead. If a chart uses one-way distance instead, follow that definition. A 25-foot lead in each direction is 50 feet of total cable, even though the work is 25 feet from the machine.
Can welding cable be too long?
Yes, welding cable can be longer than your job needs, and a longer run can raise voltage drop. Keep enough reach to work safely without pulling on the lead, then use the manufacturer’s chart to confirm the cable gauge for that distance and current.
Does thicker welding cable make a better weld?
Not by itself. A larger cable can reduce resistance in a long or high-current run, but weld quality also depends on machine settings, electrode or wire choice, workpiece condition, and secure connections. Use a cable size suited to the setup rather than choosing by thickness alone.
Can I use battery cable for a welder?
Not automatically. Battery cable and welding cable can differ in construction, flexibility, insulation, and ratings, so a similar gauge doesn’t prove that the cable is suitable for welding. Check the cable’s markings and the welder maker’s guidance before using a substitute.
Make the Cable Fit the Job
The best welding cable setup gives you enough reach without making the circuit longer than it needs to be. Start with the welder’s output and duty cycle, measure both leads, and use a sizing chart that clearly states how it counts length. That approach is more reliable than picking a gauge by feel or buying the thickest cable you can find.
I’d put connector fit and cable condition on the same checklist as cable gauge, because a sound conductor can’t make up for a loose connection or damaged insulation. Your next step is straightforward: write down your working amperage, duty cycle, and lead lengths, then compare that setup with the manufacturer’s chart before you buy or extend a lead.