Welding Cable Connectors: Common Types and Proper Fit
Welding cable connectors join a welding lead to a machine, another lead, or an accessory, and the right connector fits the cable and carries the welding current without getting hot or coming loose. Choose a matching connector pair, size it for your cable, and install it with a secure mechanical and electrical connection.
Have you ever started a weld only to feel a connector getting warm, or found a cable end that wiggles when it should lock in place? Those are frustrating problems, and they can point to a poor fit, a damaged connector, or a connection that needs more than a quick twist.
I once rushed a cable-end swap and assumed the connector was seated because it looked straight. The lead pulled free during setup, and I had to stop and redo the connection before welding; a common mistake, not a dumb one.
I wrote this to make connector selection and installation less mysterious, especially if you’re buying replacement parts or sorting out a lead that won’t stay put. You don’t need a cabinet full of fittings to make a sound choice.
Get the fit right and you can cut down on loose connections, overheated ends, and interruptions mid-job. Get it wrong, and you may deal with voltage drop, damaged cable strands, or a connection that fails when the lead gets tugged.
This takes about 8 minutes to read. By the end, you’ll know how to:
- Tell common connector styles apart.
- Match the connector to your cable and machine.
- Install a connector without damaging cable strands.
- Spot warning signs before a bad connection ruins a welding session.
Welding Cable Connectors: Types, Fit, and Core Choice
A welding cable connector joins a welding lead to a compatible machine terminal or another lead; the connector style, cable size, and current rating must all match the job. For a portable welder with matching twist-lock sockets, use the correct male plug on the lead and the matching receptacle on the machine, rather than forcing a different style into place.
The connector needs to do two jobs well: carry current across clean metal contact surfaces and hold the cable firmly enough that normal movement won’t loosen it. A loose or undersized connection can heat up, while a mismatched plug may not lock or make reliable contact.
Common connector styles include:
- Twist-lock connectors, often used on welding machines and portable leads. The plug twists into a matching socket to help resist accidental pullout.
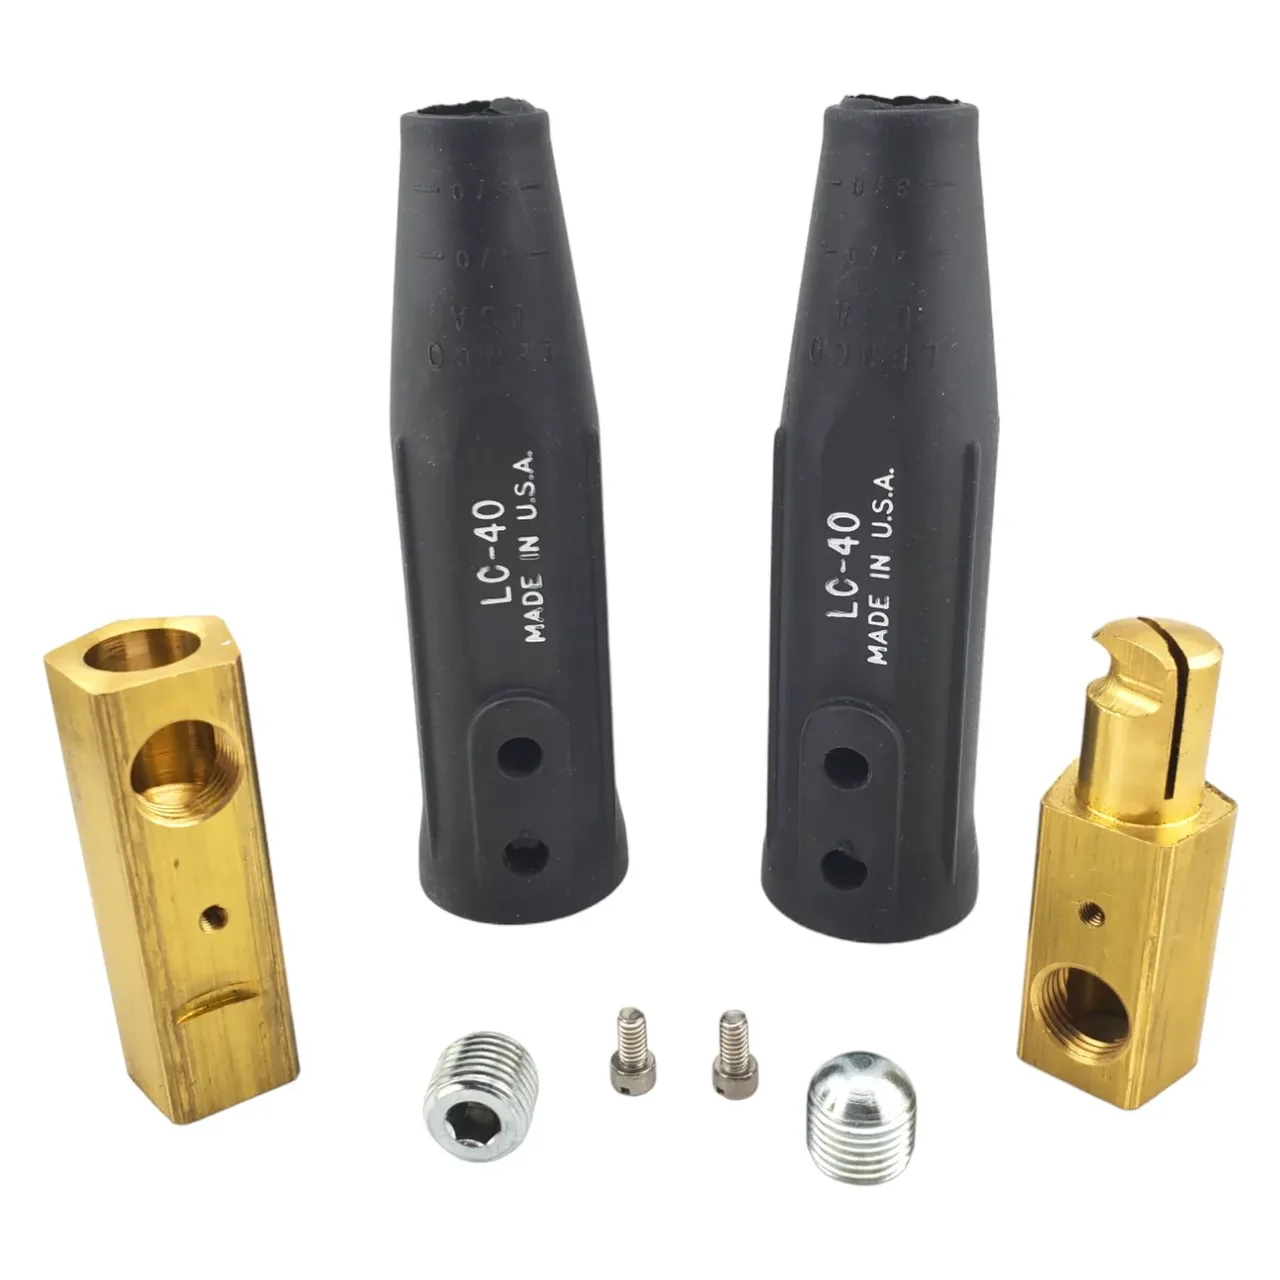
- Cam-style connectors, which use a turn-and-lock fit and are common on welding leads and some power connections. Male and female halves need to match.
- Threaded or stud terminals, which secure a cable lug to a threaded post or terminal. These rely on a properly fitted lug and a tight, clean contact.
- Cable lugs, which are ring- or barrel-shaped ends attached to a cable and fastened to a terminal. A lug isn’t a plug-and-socket connector, but it serves the same broad job of connecting a cable to equipment.
Connector names alone don’t guarantee a match. A cam-style plug from one maker may not fit a different system, and a twist-lock connector still needs the correct size and rating for the machine and cable.
A useful distinction: the work clamp attaches the welding circuit to the workpiece or welding table. It isn’t the same as the cable connector at the machine end, even though both are attached to welding cable. If you’re comparing the full lead setup, welding cables and connectors includes the cable, connectors, and work clamp as related but separate parts.
| Connector or part | Typical job | What needs to match |
|---|---|---|
| Twist-lock plug and socket | Connect a lead to a machine or extension lead | Connector style, size, current rating, and mating fit |
| Cam-style male and female pair | Join compatible cable ends | Matching connector family, cable range, and polarity setup |
| Cable lug and stud | Attach cable to a threaded terminal | Lug opening, cable size, terminal, and contact surface |
| Work clamp | Connect the welding circuit to the workpiece | Cable capacity, clamp condition, and secure bite |
The markings on a connector and welder are more useful than a visual guess. Check the connector model, cable range, polarity markings, and machine manual before ordering; a plug that looks close can still be the wrong size or design.
How to Choose the Right Connector and Cable
Choose a welding connector by checking the machine connection, cable size, current capacity, and intended use before you buy. A connector that fits the socket but is rated below the welder’s needs can become a weak point in the lead.
Start with the equipment, not the online product photo. Identify the machine-side receptacle or terminal, then check its model or markings and compare them with the connector maker’s fit information.
Next, match the connector to the cable. Welding cable size and length affect resistance and voltage drop, so a connector should suit the cable’s conductor size and outside diameter, not just its general label. For a practical method of choosing cable for the full run, welding cable size and length covers how length and size work together.
Don’t confuse a cable’s outside diameter with its conductor size. The insulation adds bulk, and two cables with similar outside diameters may have different copper cross-sections. Check the cable markings or manufacturer information rather than estimating by eye.
For a replacement connector, compare these details:
- Connector style and mating half.
- Cable conductor size and the connector’s stated cable range.
- Current rating and duty information from the connector and machine makers.
- Polarity markings, if the equipment uses polarity-specific connections.
- How the cable end attaches, such as a screw, crimp barrel, or threaded lug.
- The connector’s condition and whether the machine socket is also worn.
Current capacity depends on more than the connector alone. Cable size, cable length, duty cycle, ambient heat, connection quality, and the equipment’s instructions all matter; avoid treating one connector rating as a blanket rating for the entire lead.
Does a bigger connector automatically make the setup safer? No, not if it doesn’t fit the machine or cable properly, because a loose mating surface or poorly secured conductor can still heat up.
I’d choose a connector with clear size and rating information over a cheaper part with vague specifications. A small price difference isn’t much of a bargain if the connector won’t lock securely or its cable range doesn’t match your lead.
Pro Tip: Before removing an old connector, take a clear photo of the plug orientation and note the polarity marking. That quick reference helps you put the replacement back in the intended position.
Connector quality matters, but so does the work clamp and its placement. If your clamp slips or has damaged contact surfaces, welding work clamps explains the kinds, placement, and care that help the work circuit stay dependable.
How to Install and Maintain Welding Cable Connectors
Install a welding cable connector with the welder switched off and disconnected from power, using the attachment method specified by the connector maker. A neat-looking cable end is no good if strands are cut, the conductor is loose, or the connection hardware can’t hold it securely.
Before opening or working on a machine connection, switch the welder off and unplug it or isolate its power source. Let hot parts cool, and don’t work on energized equipment; if a machine terminal or internal connection is unclear, have a qualified repair person handle it.
The exact installation varies by connector, so follow the connector instructions and use the right crimping or fastening tool. A crimp connector needs the correct die and cable range, while a screw-type connector needs the conductor seated as directed without stray strands touching nearby parts.
- Confirm the welder is off and disconnected from power.
- Check the connector parts, cable end, and machine socket for wear, dirt, or heat damage.
- Cut back damaged cable until the conductor and insulation are sound.
- Strip only the length specified by the connector instructions, keeping copper strands intact.
- Attach the connector using its specified method and tool.
- Check that the conductor is secure and the mating connector locks or fastens properly.
- Reconnect power and test during a short, controlled welding session while watching and feeling for abnormal heat only after stopping and safely disconnecting again.
I once found a cable end where the copper strands had spread out during fitting, even though the outer insulation looked tidy. I stopped and redid the termination instead of trying to tuck the loose strands in, because stray copper can undermine the connection and create a short.
Keep connector contacts clean and dry, and check that plug bodies, locking parts, cable strain relief, and insulation remain sound. Don’t file, bend, or improvise a connector to make it fit another socket; replacing the mismatched part is the safer fix.
Important Tip: Don’t connect or disconnect a welding lead while current is flowing. Stop welding and switch the machine off first, since breaking a live connection can cause arcing and damage the contact surfaces.
A cable that gets warm near the connector deserves attention, even if the rest of the lead feels normal. Stop using it, disconnect the welder safely, and inspect the connector and cable end; don’t keep welding to see if the heat goes away.
Troubleshooting Heat, Loose Fit, and Arc Problems
A hot, loose, or erratic welding connector usually points to a poor fit, damaged contact, undersized component, or weak cable termination. Stop and inspect the connection before continuing, rather than letting a small fault cook the connector or cable insulation.
| Symptom | Common cause | Safe next step |
|---|---|---|
| Connector feels unusually hot | Loose contact, dirty surfaces, damage, or inadequate capacity | Stop, disconnect power, inspect and replace damaged parts |
| Plug won’t lock or keeps backing out | Mismatched connector halves or worn locking parts | Confirm connector style and replace incompatible or worn parts |
| Arc feels weak or unstable | Poor electrical contact, damaged lead, or another machine setup issue | Inspect the full lead path and check the machine setup |
| Cable moves inside connector | Weak termination or incorrect cable range | Stop using the lead and redo the termination as directed |
| Scorch marks or softened insulation | Overheating or arcing at the connection | Retire damaged parts and have the machine socket checked if affected |
A connector that fits loosely may be worn even if the plug and socket are the same style. Look for discoloration, pitting, melted plastic, cracked housings, bent locking parts, and copper that has darkened or pulled back.
If the plug seems fine but the connection still gets hot, inspect the machine receptacle as well as the cable end. A damaged socket can ruin a replacement connector, so a new plug isn’t always the whole repair.
Don’t keep tightening a connector beyond its instructions or add washers, foil, or other improvised shims to take up slack. Those workarounds can hide a bad fit without restoring a proper electrical contact.
After a repair, test the lead in a controlled way and stop if the connector heats, smells burnt, sparks, or loses its grip. A little inspection now is far less aggravating than finding the fault halfway through a job.
FAQs About Welding Cable Connectors
Are welding cable connectors universal?
No, welding cable connectors aren’t universal. Twist-lock plugs, cam-style connectors, threaded lugs, and machine receptacles can differ in size, shape, rating, and cable range. Match the connector to the welder’s terminal and the cable markings, then confirm fit in the equipment or connector instructions before use.
How tight should a welding cable connector be?
A welding cable connector should seat or fasten firmly using the method its maker specifies, without wobble or forced fitting. Threaded terminals need the stated tightening method, while locking plugs should engage fully. If the connector won’t hold securely, check for mismatched parts or wear rather than adding an improvised shim.
Can I replace only one side of a welding cable connector?
Sometimes, but the replacement half must match the existing connector system and remain in good condition. Mixing connector styles or incompatible sizes can cause poor contact or a loose fit. Check both halves for heat damage and wear; replace the mating half too if it no longer locks or contacts properly.
Why does my welding cable connector spark when I plug it in?
A welding cable connector can spark if connected while the machine is energized or current is flowing. Switch the welder off and disconnect its power before connecting or removing leads. If sparking happens during normal use, stop welding and have the connector and machine socket checked for damage or a poor fit.
Can a welding cable connector be repaired if the housing is cracked?
No, a cracked connector housing should be replaced rather than patched. The housing helps protect the electrical connection and hold parts in position, and glue or tape won’t restore the connector’s original fit or rating. If heat has also damaged the machine socket, have that part checked before installing a replacement.
Make the Connection A Part You Can Trust
A good welding cable connector should fit its mate without a fight, suit the cable, and stay cool and secure during normal work. If a connector feels loose, shows heat damage, or needs a makeshift fix, stop using that lead until you find the cause.
In my view, matching the connector to the actual machine and cable is the part worth slowing down for. That simple check can save you from a failed lead, a damaged socket, or the aggravation of redoing a job twice.
Your clearest next step is to read the markings on your cable and welder, then compare them with the connector maker’s fit instructions. If the match or machine wiring still isn’t clear, ask a qualified repair person rather than guessing.