You can repair some small windshield chips and short cracks with a windshield repair kit, but long cracks, edge damage, and damage in the driver’s main field of view often require professional service or full windshield replacement.
Across the United States, drivers face windshield damage from loose highway gravel, falling debris, sudden temperature changes, and road construction. A small chip on an interstate commute can quickly become a longer crack when the glass faces heat, cold, or road vibration. Acting early can help preserve your repair options and prevent a minor problem from becoming a larger expense.
Knowing how to repair a cracked windshield starts with understanding the type and location of the damage. Most modern vehicle windshields use laminated safety glass, which has two glass layers joined by a plastic layer. A repair kit can fill certain small breaks in the outer glass, but it cannot restore every damaged windshield to its original condition.
This guide explains how to assess a crack, when a DIY windshield repair kit may help, how to use one safely, and when to choose professional repair or replacement. It also covers insurance, common mistakes, and the steps that help keep a small crack from spreading while you arrange service.
1. Determine Whether Your Cracked Windshield Can Be Repaired
The first step is to decide whether the windshield is a reasonable candidate for repair. A small, isolated chip may be repairable, while a long crack or damage near the edge can weaken the glass. Do not choose a DIY method based on appearance alone.
Park the vehicle in a safe place with good light. Look at the crack from outside and inside the cabin without pressing on the glass. Note its length, the location of the impact point, any branching lines, and whether the damage lies in the driver’s direct field of view.
There is no single size limit that applies to every windshield or repair method. Some repair services can handle certain cracks several inches long, but the exact limit depends on the crack type, the glass, the equipment, and the repair standard. A kit’s stated limit is not proof that a particular crack is safe to repair.
Source: m.media-amazon.com
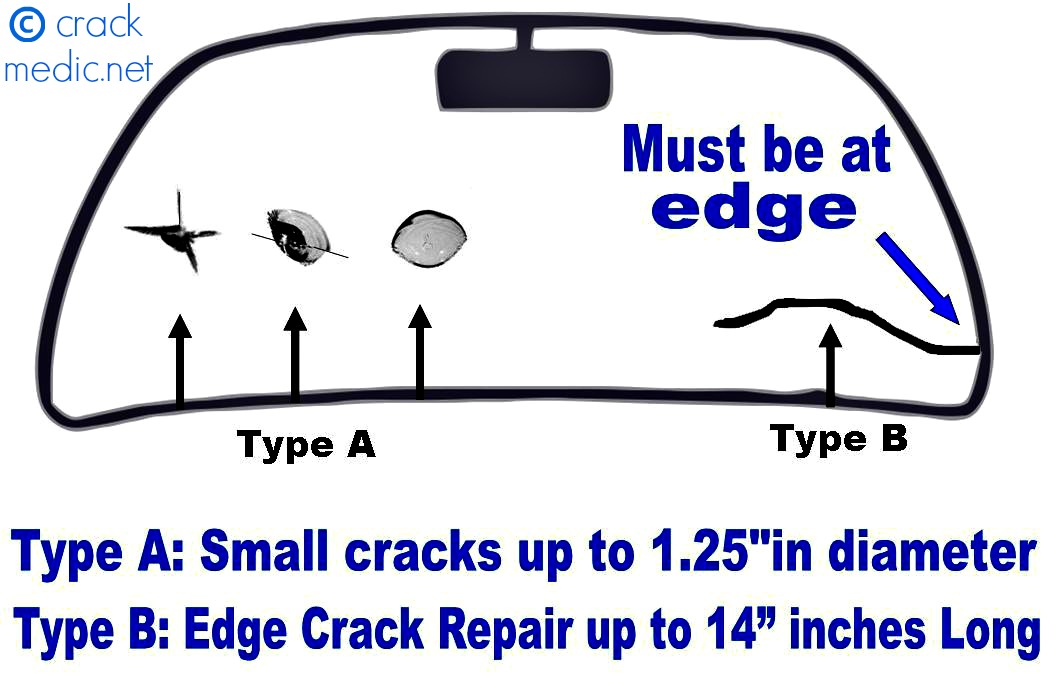
Small chip or bullseye
A compact impact mark with limited surrounding damage may be suitable for resin repair if it meets the kit instructions or a technician’s criteria.
Short crack
A short crack away from the edge and the driver’s main field of view may be repairable, depending on its depth and pattern.
Long or branching crack
A crack that extends across the glass or splits into many branches is less suitable for a basic DIY kit and may require replacement.
Edge crack
Damage that reaches or starts near the windshield edge can affect structural support. Arrange a professional assessment rather than attempting a home repair.
Damage in the driver’s view
A repair can leave a visible mark or optical distortion. If the damage interferes with clear vision, do not rely on a DIY repair to make the vehicle safe.
Why windshield construction matters
A laminated windshield has an outer glass layer, a plastic interlayer, and an inner glass layer. The interlayer helps hold the glass together when it breaks. Most standard repair kits are intended to fill suitable damage in the outer layer, not fix damage that penetrates both glass layers.
Side and rear windows may use tempered glass rather than laminated glass. A damaged tempered window usually needs replacement instead of the resin repair process used for many windshield chips. Confirm the type of glass before selecting a repair method.
Check the damage depth
If the crack appears to reach the inner layer or the damage affects both layers, stop and consult a qualified auto glass technician.
Check for multiple damaged areas
Several chips or cracks may indicate that replacement is more suitable than treating each area separately.
2. Gather the Right Tools and Materials
A DIY repair needs a kit made for automotive laminated windshield glass. Most kits contain repair resin, an applicator or bridge, a curing strip, and a tool for removing excess resin. Some also include a curing light or a small tool for preparing the impact point.
Read the full instructions before opening the kit. Resin types, curing methods, application steps, temperature limits, and recommended repair sizes vary by product. Do not mix parts from different kits or substitute household glue for automotive repair resin.
Choose a dry, sheltered work area and follow the kit’s temperature requirements. Direct sunlight can cause resin to cure too soon, while cold conditions can affect its flow and curing. If the weather is outside the permitted range, wait for suitable conditions or use a professional service.
Source: beacar.com
Automotive windshield repair kit
Choose a kit that identifies the types and sizes of damage it supports. A basic kit is not intended for every long crack or deep break.
Clean microfiber cloth
Use a clean cloth to wipe nearby glass without leaving lint or scratching the surface.
Glass-safe cleaning supplies
Use only the cleaner and cleaning method permitted by the kit instructions. Keep cleaning liquid out of the damaged area.
Protective equipment
Wear eye protection and suitable gloves when the product label calls for them. Avoid direct contact with uncured resin.
A well-lit work area
Good lighting helps you identify the impact point, inspect the damage, and check the result after curing.
What you should never use
Do not use super glue, nail polish, household epoxy, or other improvised adhesives to fill a windshield crack. These products are not designed for the optical and mechanical demands of automotive glass, and they can make later professional work more difficult.
Do not drill the glass or widen the crack with a sharp object unless a qualified technician is carrying out a procedure specifically designed for that damage. Uncontrolled pressure can cause the crack to spread.
Avoid household glue
Use automotive repair resin formulated for the intended glass repair.
Avoid forced drying
Do not use a heat gun, open flame, or extreme heat to dry the crack or cure the resin.
3. How to Repair a Cracked Windshield With a DIY Kit
A windshield repair kit uses resin to fill certain small breaks and reduce the amount of air trapped in the damaged area. When the resin cures, it can help stabilize a suitable chip or short crack and improve its appearance. It does not replace the glass or guarantee that the damage will disappear.
Proceed only if the crack falls within the kit’s stated limits, does not obstruct the driver’s view, and does not show signs of deep or edge-related damage. If any of those conditions are uncertain, have a professional inspect the glass before attempting a repair.
Source: i.ytimg.com
Step 1: Park and inspect
Park on level ground in a safe, sheltered area. Switch off the vehicle and inspect the crack under good light. Measure its approximate length and confirm that it is within the kit’s approved repair range.
Step 2: Keep the damage clean and dry
Remove loose surface dirt using the method allowed by the kit. Do not flood the crack with water or cleaning fluid. If moisture or debris is trapped inside the break, a professional repair may produce a better result.
Step 3: Set up the applicator
Fit the bridge, suction cup, or injector over the impact point exactly as directed by the manufacturer. The applicator must sit securely so the resin reaches the intended damaged area.
Step 4: Apply the specified resin
Add only the recommended amount of resin. Follow the kit’s stated pressure, waiting time, and injection sequence. Avoid forcing resin into a crack that does not respond as expected.
Step 5: Allow the resin to fill the damage
Use the injector procedure specified in the instructions. Some kits use a vacuum-and-pressure cycle to help remove trapped air and draw resin into the break. Do not improvise extra pressure or extend the procedure beyond the product directions.
Step 6: Cure the resin
Use the specified curing strip, sunlight conditions, or approved curing lamp according to the kit instructions. Follow the product’s stated curing time and temperature range instead of guessing.
Step 7: Remove excess resin
After the resin has cured as directed, remove the applicator and any curing strip. Use the supplied scraping tool only as instructed to remove excess material without scratching the glass.
Step 8: Inspect the result
Check whether the impact area looks clearer and whether the crack remains stable. A small mark may still be visible. If the crack grows, branches, or remains a clear obstruction, stop using the DIY method and arrange professional assessment.
How to tell whether the repair worked
A successful repair should leave the resin cured, the treated area stable, and the appearance improved to the degree the kit can reasonably achieve. Some repaired chips become much less noticeable, while others retain a small scar or visible outline.
Appearance alone cannot prove that the windshield has regained all its original strength. Do not assume a crack is safe simply because it looks lighter after treatment. Follow the product instructions and obtain professional advice if the result is uncertain.
Signs of a reasonable result
The resin has cured, the crack has not visibly grown, and the repaired area is less noticeable without creating a new obstruction.
Signs to stop and seek help
The crack has spread, new branches have appeared, the resin has not cured, or the damage remains in the driver’s field of view.
4. When Professional Windshield Repair Is the Better Choice
Professional repair is a better choice when the damage is difficult to assess, when a crack is longer than the kit supports, or when a DIY attempt may make the break worse. Auto glass technicians can inspect the crack, choose suitable equipment, and determine whether resin repair is appropriate.
A professional may use specialized injectors and resins that differ from consumer kits. The technician can also assess whether the break reaches an unsuitable area, whether moisture or contamination may affect the result, and whether the damage is likely to remain stable.
Do not assume that every crack can be repaired simply because a service offers crack repair. Ask whether the technician recommends repair or replacement for your specific damage and what limitations will remain afterward.
Source: vanitystardom.com
The crack exceeds the kit limit
A professional can assess whether a longer crack qualifies for a suitable repair method. Large or spreading cracks commonly require replacement.
The crack is near the edge
Edge damage can compromise the glass’s support and may call for replacement rather than resin treatment.
The damage affects vision
A technician can assess whether a repair would leave optical distortion where the driver needs a clear view.
A previous repair failed
A crack that has spread after a repair may need replacement. Tell the technician what product or service was previously used.
You are unsure about the glass layers
A professional can assess whether the damage is limited to the outer glass layer or involves deeper damage.
Questions to ask an auto glass technician
Before authorizing the work, ask what makes your windshield repairable, whether the damage will remain visible, and whether replacement is recommended for safety reasons. Request an explanation of the repair’s limitations rather than relying on a promise that the crack will vanish.
If replacement is necessary, ask whether your vehicle needs advanced driver assistance system calibration. Some vehicles have cameras or sensors mounted near the windshield, and those systems may require calibration after glass replacement.
Confirm the recommended method
Ask whether repair or replacement is appropriate and why.
Confirm the final cost
Request a quote that identifies glass, labor, calibration, and any other applicable charges.
Ask about the warranty
Check what the service covers if the repair fails or the crack spreads.
5. When You Need to Replace the Windshield
Windshield replacement is generally the right choice when damage compromises the glass’s structural role, blocks the driver’s view, or exceeds accepted repair limits. The windshield is more than a barrier against wind and rain. It also contributes to vehicle safety and helps support the proper function of certain restraint systems.
A crack that reaches the edge deserves particular attention because the edge helps secure the glass in the vehicle frame. Long cracks, multiple impact points, deep damage, and fractures that affect both glass layers also make replacement more likely.
Do not delay a replacement decision because the crack seems stable. Temperature shifts, bumps, body movement, and road vibration can change the damage. If the windshield obstructs vision or appears unstable, avoid driving and arrange professional help.
Source: crackmedic.net
Long cracks
Cracks that exceed the repair method’s limits, especially those that continue to spread, commonly require a new windshield.
Edge-to-edge damage
A crack that reaches the windshield edge can weaken structural support and is a strong reason to seek replacement.
Deep or through-glass damage
Damage involving both layers of laminated glass is generally unsuitable for a standard resin repair.
Severe visual obstruction
If the damage prevents a clear view of the road, a repair that leaves distortion may not be an acceptable solution.
Multiple damaged areas
Several cracks or chips may leave too much weakened glass for a reliable individual repair.
What happens during windshield replacement?
A qualified technician removes the damaged windshield, prepares the frame and bonding surface, and installs replacement glass with the appropriate adhesive. Correct installation matters because the adhesive helps secure the windshield to the vehicle body.
The vehicle must remain parked for the adhesive manufacturer’s required safe drive-away time. That period depends on the adhesive, temperature, humidity, and other conditions. Do not drive until the installer confirms that the vehicle is safe to use.
If the vehicle has a windshield-mounted camera or sensor, ask whether static or dynamic calibration is required. Follow the service provider’s instructions before relying on lane support, automatic braking, or other camera-based driver assistance features.
Choose suitable replacement glass
Confirm that the glass matches the vehicle’s required fit, features, and specifications.
Confirm safe drive-away time
Follow the installer’s instructions for the adhesive to cure adequately before driving.
Confirm calibration needs
Ask whether the vehicle’s cameras and sensors require calibration and how the service will be verified.
6. How to Stop a Windshield Crack From Spreading
You cannot guarantee that a crack will stop growing without repair, but careful handling can reduce avoidable stress while you arrange service. The goal is to protect the damaged area and avoid sudden changes in glass temperature or pressure.
Park in a shaded or sheltered location when possible. Avoid blasting hot or cold air directly onto the crack, and never pour hot water onto a frozen windshield. Sudden temperature changes can make the fracture grow.
Keep the damaged area dry and free of dirt. If the repair cannot happen right away, a small piece of clean, clear tape may help keep surface debris out of a suitable dry impact area. Tape is only a temporary protective measure; it does not repair the glass or make an unsafe windshield safe to drive.
Source: i.ytimg.com
Avoid rapid temperature changes
Use climate controls gently and avoid directing extreme heat or cold at the damaged area.
Reduce unnecessary vibration
Avoid rough roads and heavy impacts when possible, and close doors gently.
Protect the crack from moisture
Keep the damaged area dry before a planned repair, especially in cold weather when trapped water may freeze.
Arrange repair promptly
Early assessment can preserve repair options before the crack grows or collects contaminants.
Do not press on the glass
Avoid pushing, flexing, tapping, or trying to force the crack closed.
Why temperature and vibration matter
Glass expands and contracts as its temperature changes. A damaged area has a point of weakness, so uneven heating or cooling can place added stress around the fracture. A very cold windshield exposed to strong cabin heat is one example of a situation that can worsen existing damage.
Road vibration and vehicle body movement can also place stress on a crack. These factors do not mean every small crack will spread immediately, but they explain why a damaged windshield should be assessed promptly instead of left untreated.
In winter
Use the defroster gradually and avoid hot water or sudden heating of frozen glass.
In summer
Whenever practical, park out of direct sun and avoid rapid cooling of very hot glass.
7. Common Windshield Repair Mistakes to Avoid
Many failed DIY repairs start with an incorrect assessment or an attempt to rush the process. The most useful step is to confirm that the damage is suitable for the chosen kit before applying any resin.
Another common mistake is expecting a repaired crack to become completely invisible. Resin can reduce the visibility of a suitable break, but the impact point or fracture line may remain noticeable. A repair should be judged by its suitability and stability as well as its appearance.
Do not keep adding resin when the first application fails. Extra material cannot compensate for unsuitable damage, poor access to the break, or a crack that has grown beyond the repair method’s limits.
Choosing a kit for an oversized crack
Compare the crack with the manufacturer’s stated size and damage limits before beginning.
Working on wet or dirty glass
Moisture and debris can interfere with resin flow and affect the final result.
Ignoring curing instructions
Incorrect temperature, timing, or curing methods can leave the resin improperly set.
Using household adhesives
Unapproved glue can create optical problems and complicate later professional work.
Assuming the crack is safe because it looks better
A clearer appearance does not prove that structural strength has been fully restored.
Driving with an obstructed view
Do not continue driving if the crack blocks a clear view of the road or if the glass appears unstable.
What if the DIY repair does not work?
Stop if the crack spreads during the process, the resin does not cure as directed, or the damage remains unsuitable for safe use. Avoid repeated attempts that could worsen the break or contaminate it with additional material.
Tell the technician which kit you used, when you applied it, and whether the crack changed afterward. This information can help the technician assess whether any further repair is possible or replacement is needed.
Stop the repair attempt
Do not drill, pry, or apply more pressure to the glass.
Document the result
Take clear photos of the crack and note any visible change.
Request an assessment
Have a qualified auto glass technician decide whether the glass can still be repaired.
8. Windshield Repair Costs and Insurance in the United States
The cost of repairing a cracked windshield depends on the damage, vehicle, location, repair method, and service provider. A basic DIY kit usually costs less upfront than professional service, but it may not be appropriate for the damage. A failed attempt can also reduce the options available to a technician.
Professional chip repair is often less expensive than full windshield replacement because it keeps the existing glass in place. Replacement costs can vary substantially with the vehicle’s model, glass features, labor, and any required camera or sensor calibration. Get a quote for the actual vehicle rather than relying on a general online price.
In the United States, comprehensive auto insurance may cover windshield damage caused by events such as road debris, subject to the policy terms and deductible. Some policies include separate glass coverage, and certain states have specific rules affecting deductibles or glass claims. Coverage is not the same for every driver or policy.
Check comprehensive coverage
Ask your insurer whether the event and type of windshield damage are covered.
Ask about the deductible
Confirm whether the deductible applies to a repair, a replacement, or both under your policy.
Compare the total cost
Request an itemized estimate that includes labor, glass, calibration, and any additional charges.
Confirm approved providers
Ask whether the insurer requires a specific claim process or has a network of glass service providers.
Check state requirements
Review applicable state rules if you are concerned about vehicle inspection, windshield condition, or insurance deductibles.
Is a DIY kit cheaper than professional repair?
A DIY kit can have a lower initial price, especially for a small chip that fits the product’s instructions. However, the lowest upfront cost is not always the lowest total cost if the damage is unsuitable or the repair fails.
Consider a hypothetical example: a driver buys a kit for a small chip, but the crack later spreads and requires replacement. The original kit cost would be an added expense rather than a substitute for the replacement. The actual financial outcome depends on the damage, policy coverage, and repair result.
Before buying a kit, ask a professional whether the damage is repairable and check your insurance benefits. Some insurers may cover an eligible repair with a lower out-of-pocket cost than expected.
For a suitable small chip
A kit may be a reasonable option if you can follow the instructions and accept that some damage may remain visible.
For a spreading crack
Get a professional assessment before spending money on a kit that may not be suitable.
For likely replacement
Compare written quotes and confirm insurance coverage before authorizing the work.
9. Can You Drive With a Cracked Windshield?
Whether you can safely drive with a cracked windshield depends on the damage’s location, size, depth, and effect on visibility. A small chip away from the driver’s view may not create the same immediate risk as a spreading crack across the windshield, but neither should be ignored.
Do not drive if the damage blocks your view, the windshield appears unstable, or the crack is spreading rapidly. Arrange mobile glass service or other safe transport if the vehicle should not be driven. A temporary tape covering does not make unsafe glass roadworthy.
State laws and inspection rules vary. A vehicle that appears drivable may still fail an inspection or violate a rule if the damage obstructs required visibility. Check the rules that apply where the vehicle is registered and driven instead of assuming that one national crack-length limit applies everywhere.
Small damage outside the driver’s view
Arrange prompt inspection and repair. Whether short-term driving is reasonable depends on the condition of the glass and local requirements.
Damage in the main field of view
Avoid driving if the crack interferes with a clear view of the road.
Edge damage or severe spreading
Seek professional advice before driving because the glass may have reduced structural integrity.
A shattered or unstable windshield
Do not drive the vehicle. Arrange professional assistance.
Why the windshield is a safety component
The windshield helps keep occupants inside the vehicle during a crash and contributes to the performance of certain restraint systems. Its bond to the vehicle body also matters to the way some vehicles manage crash forces.
For vehicles equipped with passenger-side airbags that deploy upward against the windshield, correct glass installation and bonding can be important to proper airbag performance. This is one reason a severely damaged windshield or an improperly installed replacement should not be treated as a minor cosmetic problem.
Do not judge safety by appearance alone
A small-looking crack can still need assessment based on its location and depth.
Use qualified installation service
If replacement is needed, choose a provider that follows suitable installation and calibration procedures.
Frequently Asked Questions
Q
Can I repair a cracked windshield myself?
Yes, some small chips and short cracks can be treated with a DIY windshield repair kit. The damage must fit the kit’s size and type limits and should not compromise the driver’s view or the windshield edge. Long, deep, spreading, or uncertain damage should be assessed by a qualified auto glass technician.
Q
Can toothpaste or super glue fix a windshield crack?
No. Toothpaste cannot bond a windshield crack, and super glue is not designed for automotive glass repair. These household products do not provide a reliable repair and may complicate later professional work. Use a suitable automotive windshield repair kit only when the damage qualifies.
Q
Will a windshield repair make the crack disappear completely?
Not always. Resin can fill suitable damage and improve clarity, but the impact point or fracture line may remain visible. The result depends on the type, size, depth, cleanliness, and age of the damage. A repair should not be judged by appearance alone.
Q
How long does windshield crack repair take?
A simple resin repair may take around 30 minutes, although the actual time varies by damage and product instructions. Professional repairs may take longer when the crack is complex. Windshield replacement takes additional time for removal, installation, adhesive curing, and any required camera or sensor calibration.
Q
Will car insurance pay for windshield crack repair?
Comprehensive auto insurance may cover windshield damage, depending on the cause of the damage, your policy, deductible, and state rules. Some policies offer separate glass coverage or waive a deductible for eligible repairs. Contact your insurer before authorizing service to confirm the benefits and claim process.
Q
How long can I wait before repairing a cracked windshield?
There is no universally safe waiting period. A small chip may remain stable for a time, but temperature changes, road vibration, moisture, and impact can cause it to spread without warning. Arrange an assessment promptly, and do not drive if the crack obstructs your view or the windshield appears unstable.
Q
Can a long windshield crack be repaired with resin?
Some specialized professional methods can address certain cracks that are longer than those supported by basic DIY kits. However, long cracks, edge cracks, and branching damage often require replacement. The exact decision depends on the glass, crack location, damage depth, and the repair method’s limits.
Q
Does a cracked windshield always need replacement?
No. Some small chips and short cracks can be repaired without replacing the glass. Replacement is more likely when the damage is extensive, reaches the edge, affects both glass layers, creates an unacceptable obstruction, or falls outside accepted repair limits. A professional assessment can help determine the suitable option.
✦ Wrapping Up
Conclusion
Learning how to repair a cracked windshield can help you decide whether a small chip is suitable for a DIY kit or whether you need professional service. The key is to assess the crack before applying resin, follow the kit’s instructions, and understand that a repair may leave a visible mark.
Do not attempt a basic DIY repair on a long or spreading crack, damage near the windshield edge, or a break that obstructs your view. These conditions may call for professional repair or full replacement. If the windshield appears unsafe, avoid driving until the glass has been assessed.
For the best next step, photograph the damage, note its approximate size and location, and contact an auto glass service or your insurer. Early assessment can help preserve repair options, clarify costs, and ensure the vehicle receives the appropriate treatment.
💡 Key Takeaway
Inspect the crack today. If it is small, away from the edge and driver’s main field of view, and within a kit’s stated limits, consider a suitable windshield repair kit. Otherwise, arrange a professional assessment and confirm your insurance coverage before proceeding.