Stick Welding Electrode Holder Parts and Maintenance
A stick welding electrode holder grips the electrode and carries welding current from the cable to the rod. Its jaws, insulated body, handle, spring, pivot, and cable connection all need to stay clean, tight, and in good shape.
Have you ever had an electrode slip just as you were settling into a weld? Or noticed a hot spot near the holder and wondered whether the holder, cable, or connection was to blame?
I once kept fighting an electrode that wouldn’t stay put, then found a worn jaw was the real problem. I’d spent time adjusting my technique when the holder needed attention, a common mistake, not a dumb one.
I wrote this for anyone who wants to understand the parts, spot trouble early, and make a safe call about cleaning, repair, or replacement. You don’t need a shop full of tools to do the basics, but you do need to know what you’re looking at.
Get the inspection right and you can avoid a slipping rod, a poor electrical connection, or a holder that gets too hot in your hand. Skip the checks and a small worn part can turn a steady welding job into an irritating stop-and-start session.
This should take about 9 minutes to read. By the end, you’ll know how to:
- Identify the main parts and what each one does.
- Check for wear, heat damage, and loose electrical connections.
- Clean and maintain a holder without damaging its insulation.
- Choose a safe replacement when repair isn’t the right call.
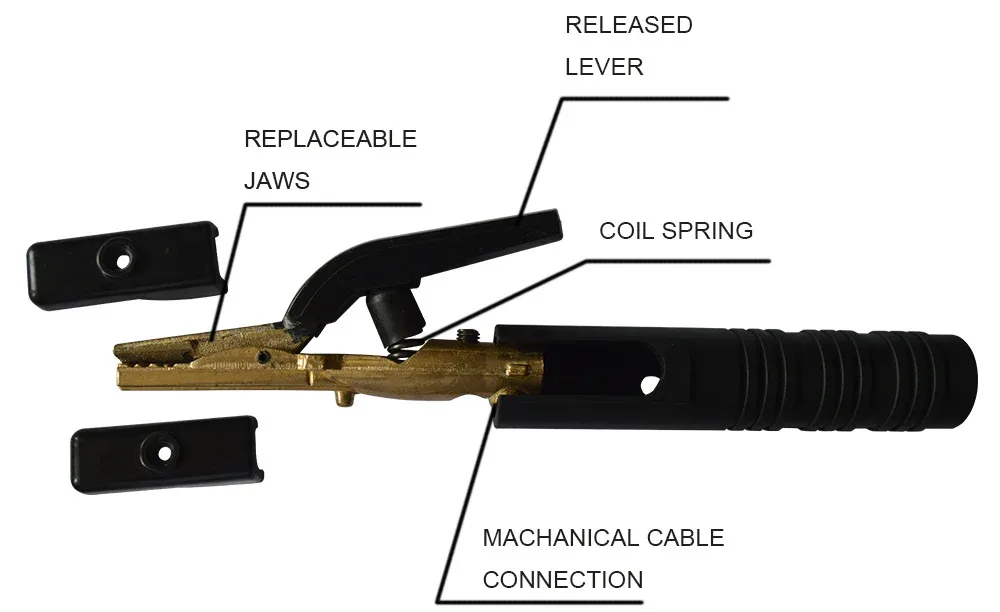
Stick Welding Electrode Holder Parts: What Each Part Does
A stick welding electrode holder uses a conductive jaw assembly to grip the rod, an insulated body and handle to protect your hand, and a cable connection to carry current. Most holders have a spring or clamping mechanism that keeps the electrode secure; the exact layout varies by model.
Here are the common parts and their jobs:
| Part | What it does | What to check |
|---|---|---|
| Jaws | Grip the electrode and conduct current into it. Some designs have several grooves or positions for different rod angles. | Look for worn grooves, pitting, cracks, or a rod that slips. |
| Head or jaw assembly | Holds and positions the jaws at the front of the holder. | Check for looseness, cracked sections, or signs of overheating. |
| Handle and insulating body | Give you a grip while keeping your hand away from live conductive parts. | Look for cuts, cracks, melted spots, or loose insulation. |
| Spring and pivot | Open and close the jaws, then hold the electrode in place. | Check for weak clamping, sticking, or a loose pivot. |
| Cable lug or terminal | Connects the holder to the welding cable and carries current into the holder. | Look for a loose fastener, damaged cable strands, or heat marks. |
| Insulating covers or caps | Shield exposed metal near the head or cable connection, depending on the design. | Check that covers are present and seated firmly. |
A jaw is the part that touches and grips the electrode. When the jaw surface gets rounded, pitted, or packed with spatter, the rod may wobble or lose reliable contact, which can make the arc erratic.
The handle and head may be one molded body or separate pieces, and some holders have few parts you can replace on their own. Before buying a part, check the holder’s manual or manufacturer’s parts list, since the same-looking holder can use a different spring or head assembly.
A stick holder is also called a stinger. It’s one kind of electrode holder, distinct from the guns and torches used in other welding processes; a quick comparison of welding guns, torches, and holders can help keep the names straight.
Do you need every part to be metal? No. The holder needs conductive parts where current flows and sound insulation where you grip it, but the materials and construction differ by design.
A useful way to think about the current path is cable, cable terminal, holder body or head, jaw, then electrode. A loose or damaged spot anywhere along that path can add resistance, create heat, or interrupt the arc.
Pro Tip: If your holder has multiple jaw grooves, clamp the rod in a clean groove that holds it firmly without crushing or bending the electrode.
How to Inspect and Maintain a Stick Holder
A safe inspection starts with the welder switched off and disconnected from power, with the holder away from the workpiece and any exposed electrode. Once it’s cool, check the insulation, clamping action, jaws, and cable connection before cleaning or tightening anything.
Follow these steps:
- Make the machine safe. Switch it off, unplug it or isolate its power source as the machine instructions direct, and let the holder cool. Don’t handle the holder while the machine is energized.
- Check the insulation. Look over the handle, head, and any covers for cracks, burns, melted areas, or exposed metal where your hand could touch.
- Test the clamp by hand. Open and close the jaws while the holder is disconnected. They should move freely and grip an electrode without slipping or feeling unusually weak.
- Inspect the cable end. Check for a loose terminal, discoloration, damaged strands, or a cable jacket that’s split near the connection.
- Clean accessible surfaces. Brush away loose dirt and spatter with the holder disconnected. Don’t grind or file away metal just to make a worn jaw look clean.
- Reassemble and check the fit. Follow the holder’s instructions, then confirm the cable terminal is secure and the insulating covers sit in place.
My own maintenance shortcut was brushing off the visible jaw and calling the job done, while ignoring the cable end. The holder still felt warm after a short weld, which sent me back to check the connection; the useful lesson was to inspect the whole current path, not just the part you can see from above.
What does a hot holder tell you? Heat near the jaws can point to poor electrode contact, while heat at the cable end can point to a loose or damaged connection. Stop welding and inspect the holder and cable after they cool; don’t keep working through a hot spot.
Use a dry brush or a clean cloth for ordinary dirt. Avoid soaking the holder or spraying cleaner into its moving parts, because fluid can remain inside or affect the insulation; if the manufacturer allows a specific cleaner, follow those instructions.
A little spatter on a jaw isn’t automatically a reason to replace the holder, but metal loss, deep pitting, cracks, or a jaw that won’t grip are different matters. An electrode that rotates or drops when you move the holder is a practical warning sign, even if the outer shell looks fine.
Important Tip: Never tape over cracked or melted insulation as a repair. Tape can hide damage without restoring the holder’s designed insulation or safe grip.
Repair, Replace, and Choose the Right Holder
A holder can be repaired only when the damaged part is replaceable and the repair restores a secure grip, a sound electrical connection, and intact insulation. Replace the holder if its body is cracked or melted, a conductive part is badly damaged, or you can’t confirm a safe repair from the manufacturer’s instructions.
Small repairs can be reasonable when the maker supplies the correct replacement part and the instructions cover the repair. A worn spring, for instance, may be serviceable on some holders, while another model may call for replacing the full head or holder assembly.
Don’t improvise with a mismatched spring, an oversized fastener, or a homemade insulating cover. A part that seems to fit can still leave a loose connection or expose metal where you grip the holder.
When you shop for a replacement, match the holder to your welding machine and cable, not just the shape of the old one. Check these details:
- Amperage rating: Choose a holder rated for the welding current and duty cycle you expect to use. Follow the machine and holder maker’s ratings.
- Cable compatibility: Confirm the cable size and terminal style fit the holder’s connection.
- Electrode size and grip: Make sure the jaws accept the rods you use and hold them securely.
- Insulation and build: Look for an intact, comfortable handle and a design suited to your work position.
- Replacement parts: If you value repairability, check whether the maker offers service parts for the jaw assembly or spring.
A duty cycle is the amount of time a welding machine or accessory can operate within a set period before needing to cool, as defined by its rating. A holder’s current rating and duty cycle should suit the job; don’t assume a larger-looking holder is automatically a better match.
| Condition | Best next move |
|---|---|
| Dirt or loose spatter, with sound parts | Clean the holder while disconnected. |
| Weak clamping and a maker-approved replacement spring | Replace the spring using the holder’s instructions. |
| Loose cable terminal, with intact cable and holder | Tighten or repair only as the maker directs. |
| Cracked, melted, or badly pitted conductive parts | Stop using the holder and replace the affected assembly or holder. |
| Exposed wire, burnt cable jacket, or heat damage at the cable end | Stop welding and have the cable connection repaired or replaced safely. |
What if the holder gets hot even after you’ve cleaned and tightened the accessible parts? Stop using it until you’ve checked the cable, terminal, and holder against the machine and holder instructions, or had a qualified repair person inspect the setup.
The same word, “gun,” can also cause confusion when you’re shopping for welding parts. MIG welding gun parts belong to a wire-feed setup, while TIG torch parts serve a different torch arrangement; neither is a substitute for a stick holder.
I’d choose a reputable holder with clear ratings and a solid cable connection over a bargain model with no useful parts information. It’s a hand-held electrical tool, so a few dollars saved don’t mean much if the grip or connection becomes unreliable.
FAQs About Stick Welding Electrode Holder Parts
What are the main parts of a stick welding electrode holder?
The main parts are the jaws, head or jaw assembly, insulated handle, spring and pivot, and cable terminal. Some designs also have separate insulating covers or caps. The jaws grip the electrode and carry current, while the insulated sections help protect your hand from conductive parts.
Why does my stick welding electrode holder get hot?
A stick welding electrode holder can get hot from poor contact at the jaws, a loose cable terminal, damaged cable strands, or use beyond its rating. Stop welding and let the holder cool before inspecting it. Don’t continue using a holder with melted insulation, a damaged cable, or unexplained heat.
Can I replace the jaws on a stick welding electrode holder?
Some stick welding electrode holders have replaceable jaws or a replaceable head assembly, while others don’t offer individual service parts. Check the maker’s instructions and parts information before disassembly. If the holder body is cracked or melted, replacing only the jaws won’t restore the damaged insulation.
How tight should an electrode holder grip the rod?
The holder should grip the electrode firmly enough that the rod doesn’t slip or rotate during normal handling. You shouldn’t need to crush the rod or force the jaws closed. If the electrode moves in a clean, properly positioned jaw, inspect for wear or a weak spring.
Can I use a MIG gun or TIG torch as a stick electrode holder?
No. A MIG gun feeds welding wire, and a TIG torch holds a nonconsumable electrode and often routes shielding gas. A stick electrode holder has a different job and connection.
Use the holder and accessories designed for the welding process and machine you’re running.
Keep the Holder Safe and Ready
A stick welding electrode holder doesn’t need much attention, but the checks matter: look at the jaws, insulation, spring, and cable connection before a worn part creates trouble. If the holder slips, heats up, or shows cracked insulation, pause the job instead of trying to tough it out.
My preference is to replace a holder when its body or insulation is damaged, and repair only when the maker identifies a suitable part and a safe method. That keeps the decision simple and avoids a patch that looks tidy but doesn’t fix the problem.
Your next step is easy: disconnect the welder, let the holder cool, and give it a careful look before the next rod goes in.