To remove a windshield washer nozzle, open the hood, access the underside of the nozzle, disconnect the washer hose, release the retaining clips or screws, and push or lift the nozzle out without forcing it.
For drivers in the United States, windshield washer nozzles are usually mounted in the hood, cowl area, or occasionally on the wiper arm. The exact removal method varies by vehicle, but many hood-mounted designs use plastic retaining tabs that must be squeezed or released before the nozzle can be pushed out.
Before starting, check your vehicle owner’s manual or service information if the nozzle is difficult to access or has electrical wiring for a heated washer system. Manufacturer procedures show that some vehicles require removal of a hood insulator, cowl panel, or other trim before the nozzle can be reached.
The job usually requires only basic hand tools, but the exact tools depend on how the nozzle is secured. A flashlight helps you see the retaining tabs under the hood, while a plastic trim tool or small flat screwdriver can help release clips. Covering the tip of a screwdriver with tape can reduce the chance of scratching painted surfaces.
Park on a level surface, switch the ignition off, and make sure the hood is securely supported. If the vehicle has heated washer nozzles, look for an electrical connector before pulling the nozzle free.
Source: storage.googleapis.com
Basic tools
Prepare a flashlight, clean rag, plastic trim tool or small flat screwdriver, and needle-nose pliers if the hose or clips are difficult to reach.
Replacement nozzle
If you are replacing the nozzle, verify the replacement against your vehicle’s year, make, model, trim, and equipment before removing the original.
Safety preparation
Keep fingers clear of moving wiper mechanisms and do not work around an operating wiper system.
Identify How the Nozzle Is Mounted
Look at the nozzle from underneath the hood before attempting removal. A clip-in nozzle normally has one or more flexible retaining tabs. A screw-mounted nozzle has a visible fastener, while some designs use a nut or another retaining piece. A nozzle attached to a wiper arm requires a different procedure from a hood-mounted nozzle.
Clip-in
Usually released by squeezing or depressing retaining tabs and pushing the nozzle through the mounting hole.
Screw or nut retained
Remove the fastener first, then separate the nozzle from the hood or mounting panel.
Wiper-arm mounted
The nozzle may clip directly to the wiper arm, so removal can involve releasing the arm-mounted retainer instead of accessing the hood.
How to Remove a Windshield Washer Nozzle
For a typical hood-mounted clip-in nozzle, the removal sequence is straightforward: gain access, disconnect the hose, release the retainer, and remove the nozzle. Do not pry against the painted hood with excessive force because the retaining mechanism should release without bending the panel.
Some manufacturer procedures specifically instruct technicians to pinch the nozzle retainers and push the nozzle outward from the hood. Other designs use a screwdriver to disengage claws or a screw that must be removed first.
Source: storage.googleapis.com
Step 1: Open the hood
Secure the hood and locate the washer nozzle from below. Remove a hood insulation panel or nearby trim only if it blocks access.
Step 2: Disconnect the washer hose
Hold the nozzle and gently work the rubber or plastic washer hose off its inlet barb. Expect a small amount of washer fluid to drip.
Step 3: Release the retainer
Press the retaining tabs inward or disengage the clip according to the nozzle design. Support the surrounding panel while releasing the retainer.
Step 4: Push the nozzle out
Once the retaining tabs are released, push or lift the nozzle through the mounting hole in the direction allowed by its design.
Step 5: Disconnect electrical wiring if present
If the nozzle is heated, release its electrical connector before completely removing the nozzle. Do not pull on the wiring.
If the Nozzle Will Not Come Out
Stop if the nozzle does not move after the retaining mechanism has been released. Recheck for a hidden clip, screw, nut, electrical connector, or access panel. Some nozzles have more than one retaining claw, and pushing from the wrong direction can make the clip stay engaged.
If the nozzle is stuck because of dirt or age, clean around the mounting area and work the retainer gently. Avoid levering hard against the hood because a small plastic part is easier and cheaper to replace than damaged paint or sheet metal.
Check for a second retainer
Look around the entire nozzle body for additional clips or locking claws.
Check for a fastener
Some designs use a screw or retaining nut rather than a simple snap-fit.
Check the access path
A hood liner, cowl panel, or trim piece may need to be removed before the nozzle can be released safely.
How to Install the Replacement Washer Nozzle
Install the replacement nozzle by reversing the removal process, but make sure the nozzle is seated and locked before reconnecting everything. Push a clip-in nozzle into its mounting hole until its retaining tabs engage securely.
Reconnect the washer hose firmly to the nozzle inlet. If the vehicle uses a heated nozzle, reconnect the electrical connector as well. Reinstall any hood insulation, cowl trim, or hose clips that were removed for access.
Source: storage.googleapis.com
Confirm the fit
The nozzle should sit securely in the mounting hole without excessive movement.
Reconnect the hose
Push the washer hose fully onto the nozzle inlet so it cannot easily pull off.
Restore hose routing
Return the washer hose to its original clips or guides so it does not kink or interfere with the hood or wiper mechanism.
Reconnect electrical components
Reconnect any electrical connector used by a heated washer nozzle before testing the system.
Test the Washer Spray Pattern
After installation, close the hood and test the windshield washer system. Confirm that fluid reaches the windshield and that there are no leaks around the nozzle or hose connection. The correct spray location varies by vehicle, so use the vehicle-specific specification when an adjustment procedure is provided.
If the spray is weak, uneven, or directed away from the windshield, do not automatically assume the nozzle is installed incorrectly. A clogged nozzle, kinked hose, low washer-fluid level, blocked filter, or pump problem can produce similar symptoms.
Successful installation
The nozzle remains securely mounted, the hose connection does not leak, and washer fluid reaches the windshield.
Poor spray after replacement
Check the fluid level, hose routing, nozzle opening, and washer system before replacing another component.
Common Problems and Mistakes to Avoid
Most washer nozzle removal problems happen because the retaining mechanism is not identified before force is applied. Plastic clips can become brittle with age, and forcing them can break the nozzle or its mounting point.
The washer system also has components beyond the nozzle. If a new nozzle does not solve a spray problem, inspect the hose and fluid supply instead of repeatedly adjusting or replacing the nozzle.
Source: storage.googleapis.com
Prying against painted metal
Avoid using excessive leverage against the hood. Use a protected trim tool and release the actual retaining clip.
Pulling the hose aggressively
Old washer hoses can split or crack. Twist the hose gently while supporting the nozzle.
Ignoring heated nozzles
A heated nozzle can have an electrical connector that must be disconnected before removal.
Forcing the wrong direction
Retaining tabs can lock more tightly if the nozzle is pushed in the wrong direction. Inspect the underside first.
Assuming every nozzle is adjustable
Some modern washer nozzles use a fixed spray design or require replacement rather than manual adjustment.
When to Stop and Use Vehicle-Specific Service Information
Use model-specific service information if the nozzle is integrated into a complex cowl assembly, has electrical wiring you cannot identify, requires wiper-arm removal, or does not match the common clip-in design. The removal direction, access panels, and spray adjustment specifications can differ substantially between vehicles.
Stop for damaged hardware
If a mounting hole, clip, hose, or electrical connector is damaged, repair the affected component rather than forcing the nozzle back into place.
Stop for uncertain wiring
If you cannot determine whether a connector belongs to the heated nozzle or another component, consult the vehicle-specific wiring or service information.
Washer Nozzle Removal by Mounting Type
The table below summarizes the common removal approaches. It is a general guide rather than a substitute for the procedure for a specific vehicle.
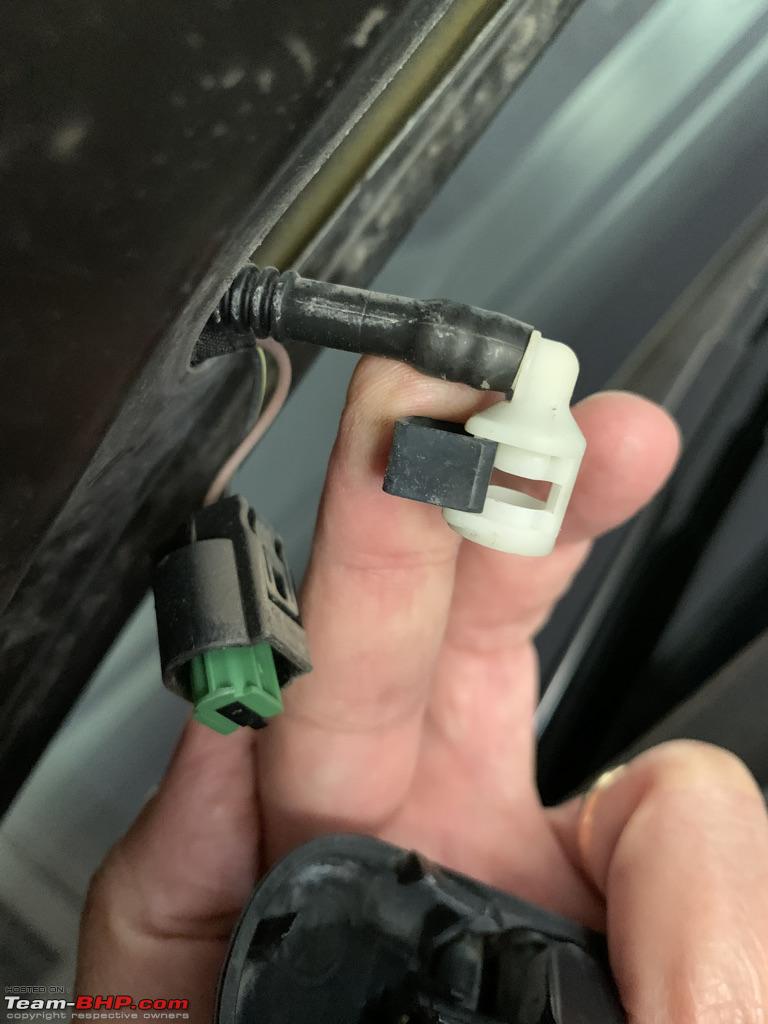
Source: team-bhp.com
Clip-in hood nozzle
Disconnect the hose, squeeze or release the retaining tabs, and push the nozzle through the hood.
Screw-retained nozzle
Disconnect the hose and remove the retaining screw before lifting the nozzle away.
Nut-retained nozzle
Access the retaining nut from below, remove it, then separate the nozzle from the panel.
Wiper-arm nozzle
Release the nozzle’s arm-mounted clip and disconnect the hose as required by the vehicle design.
Heated nozzle
Follow the normal mechanical removal method but disconnect the electrical connector before pulling the nozzle completely free.
What If Only One Nozzle Is Clogged?
A clogged nozzle does not necessarily need to be removed immediately. If the nozzle can be cleaned according to the vehicle manufacturer’s guidance, cleaning may restore the spray. If cleaning does not work or the nozzle is damaged, removal and replacement may be appropriate.
Check the fluid first
Make sure the washer reservoir contains an appropriate windshield washer fluid.
Inspect the hose
Look for kinks, splits, disconnected sections, or restrictions that could prevent fluid from reaching the nozzle.
Inspect the nozzle
Look for visible contamination or physical damage before deciding that the nozzle needs replacement.
Frequently Asked Questions
Q
How do I remove a windshield washer nozzle from a hood?
Open the hood and access the underside of the nozzle. Disconnect the washer hose, release the retaining clips or fastener, and push the nozzle out through the mounting hole. The exact release direction depends on the vehicle.
Q
Do I need to remove the hood to replace a washer nozzle?
Usually, no. Many hood-mounted nozzles can be removed with the hood open. However, some vehicles require removal of a hood insulator, cowl panel, or other trim to reach the retaining mechanism.
Q
Why will my windshield washer nozzle not come out?
A hidden retaining tab, screw, nut, electrical connector, or access panel may still be holding it in place. Recheck the underside of the nozzle before applying more force. Avoid prying aggressively against painted metal.
Q
Can I remove a washer nozzle without disconnecting the hose?
Some designs allow limited movement while the hose remains connected, but complete removal normally requires separating the hose from the nozzle. Disconnect it carefully to avoid damaging an aged hose or nozzle inlet.
Q
Why is my new washer nozzle spraying in the wrong place?
The nozzle may not be fully seated, the nozzle may require vehicle-specific adjustment, or the replacement part may not match the vehicle. Some modern nozzles have fixed spray characteristics, so follow the applicable vehicle service procedure rather than forcing the spray opening.
✦ Wrapping Up
Conclusion
Removing a windshield washer nozzle is often a simple repair once you identify how the nozzle is retained. For the common clip-in design, the basic process is to access the underside, disconnect the washer hose, release the retaining tabs, and push the nozzle out without damaging the hood or surrounding trim.
Because nozzle designs vary between vehicles, do not assume that every nozzle uses the same clips or removal direction. If the part has screws, electrical connections, unusual retainers, or difficult access, use the procedure specified for your vehicle. After installing the nozzle, check the hose connection for leaks and verify that the washer spray reaches the windshield correctly.
💡 Key Takeaway
Before applying force, identify the nozzle’s retaining method from underneath the hood. Release that mechanism first, protect the painted surface, and test the washer system after installation.